GSD
Headless Drupal: The What, Why and How
Posted by Fernando Doglio on September 21, 2023
Table of contents
When it comes to content management systems, Drupal is one of the key players in town and is a great example of a multi-purpose system with a very extensive set of features and capabilities, including a headless interface.
What is Headless Drupal?
A Headless CMS, whether it’s Drupal, WordPress or any other, is a CMS that provides you with a different way of interacting with it: through an API.
With that being said, Drupal offers a couple of different flavors of headless that you can aim for, depending on your needs:
Classic Headless Architecture
The classic headless architecture consists of Drupal as the back-end service, which provides all main CMS-related functionalities and storage (mainly of your content), while your front-end lives as a separate project, one with its own back-end using Drupal as an external, 3rd party service.
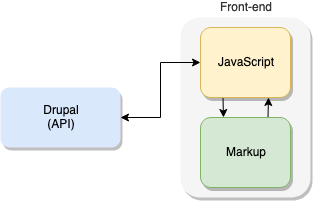
The architecture would look something like this:
In this scenario, you gain full control over the presentation of your site and you have the freedom to create any type of application.
With the classic setup, you could be developing a mobile native app, a desktop application or anything else with the capability of requesting and sending information to and from an external resource (in this case: Drupal).
Static Architecture
While the previous example is perfect for someone looking for flexibility and trying to decouple their development from Drupal, you might not be looking for such a thing. Maybe you’re just trying to build a website on top of Drupal but the UI is just not what you want or perhaps what you’re trying to do is just a simple static site powered by Drupal but with a very customized presentation.
If this is you, then maybe you’d benefit from a simpler architecture, such as using JAMStack with a Drupal backend.
The above image shows what a Drupal-based JAMStack would look like.
If you’re not familiar with this technology stack, JAM stands for JavaScript, API and Markup. And it’s intended for scenarios like this one: when your back-end is completely dependent on a 3rd party API, in this case, Drupal.
In addition, JAMStack is also perfect for static sites, because their own intention is to display content, so all you need to do is set up the content in your Drupal instance, then query it using your favorite JavaScript framework and finally render it using your preferred HTML site template.
Why Use Headless Drupal?
Now that we’ve cleared the air regarding the What, let’s cover the Why.
Normally, content management systems try to offer all their capabilities in a bundle: you get the core back-end with all the features you need, but you’re also given the UI which attempts to solve all the needs of their intended users.
The problem with this? Not all users have the same needs. Just off the top of my head, you have:
- The power users, those who have all the time in the world to understand every bit of the system they’re using and aim to utilize most of it. They have complex needs and the capability of learning a new system from scratch (by this I mean that not only are they willing to do so, but also have the resources for it, either in the form of time or money to pay for courses, etc).
- The “I don’t have the time to learn something new” type of users. They have complex needs normally, but they can’t (or want to) learn how the whole system works, they just need a couple of buttons to do exactly what they need and that’s all.
- The content-related users. Not all users will be interested in the entire site, some of them will only care about the content, such as editors, authors (and if you want to be even more specific, maybe even designers trying to fine-tune some graphics). Either way, these users will only care about a very small portion of the entire admin UI.
- Presentation-related users. On the other side of the spectrum, you have the users that don’t care about the content, but rather about how it looks. These users aren’t interested in the content-related capabilities of the admin UI, all they care for is being able to customize the presentation as much as possible.
I’m sure you can also think about a couple of extra user types I’ve left out, but the point here is: they care about different things, so why would they need to use the same interface for all their needs?
Here is where a headless option comes in very handy because you can give each one of your users exactly what they need without losing access to the entire set of features from the CMS.
Some benefits that stem from the headless approach:
- More control: As I’ve already covered, you gain more control over the way you present your content. You’re in complete control over the presentation and any extra transformations you might want to perform before actually rendering the content.
- One content, multiple presentations: This is key if you’re interested in a multi-channel approach. Are you looking for a way to show your content on the web, on mobile and maybe on your custom desktop app? Having a centralized source of content is key for these scenarios because you save quite a lot of time editing and managing all content from a single point.
- Decoupled approach means easier parallel development: Your back-end teams (if any) and your front-end teams will have fewer dependencies on each other, allowing them to progress on their work faster.
- Future proven content: Who knows what mobile will look like in two years? Or how many new internet-connected devices will pop-up in the next five? With Headless Drupal, your content is already compatible with them, all you’ll have to worry about is about creating the correct presentation and pull the already existing content from the single source of truth that is your CMS.
- Customized UIs to simplify your user experience: Although it might require some extra work, you can customize the UI for your different users’ needs, giving them exactly what they need and leaving everything else out. This would help them reduce time-to-market.
There are many benefits to a headless option with either a classic approach or a static architecture.
You will need developer resources, something you may not currently have access to if you use Drupal's integrated UI. Keep in mind that if you’re looking for a lightweight headless CMS, there are fully headless alternatives such as ButterCMS that might better suit your needs.
How to use Drupal as a Headless CMS: An Example
Let’s now review a quick example of how you can go about using Drupal’s API with your own code.
Incredibly enough, the hard part about this is not communicating with the API, which is quite easy to achieve, the unnecessarily complicated part is the configuration of the API.
Setting up Drupal
I won’t cover the installation steps for Drupal, if you haven’t done that yet, please check out their full documentation on it. That being said, for the sake of simplicity, you can quickly follow these steps:
- Download the source code from their Download page.
- Uncompress it and then get into the folder.
- Start the development server simply typing:
php core/scripts/drupal quick-start
Then execute this command and you’ll see the following options:
Picking the standard one will eventually complete and show you the following output:
Notice the username and the password shown there. Those are the credentials you’ll need for the first time.
With these steps, you’re ready to start working. In fact, your browser will open up a page for you to set up the new admin password. Afterward, you’re ready to log-in and start creating content.
Enabling the Drupal REST API
With that, in order to enable the REST API, you’ll need to do a few things:
- Enable the “RESTful Web Services” extension. For this, go into the “Extend” section of the main menu, and then scrolling all the way down under the “Web Services” section, click “RESTful Web Services” and then click the “Install button”. If you’re asked to enable any other modules (i.e serialization), just go ahead and do it too.
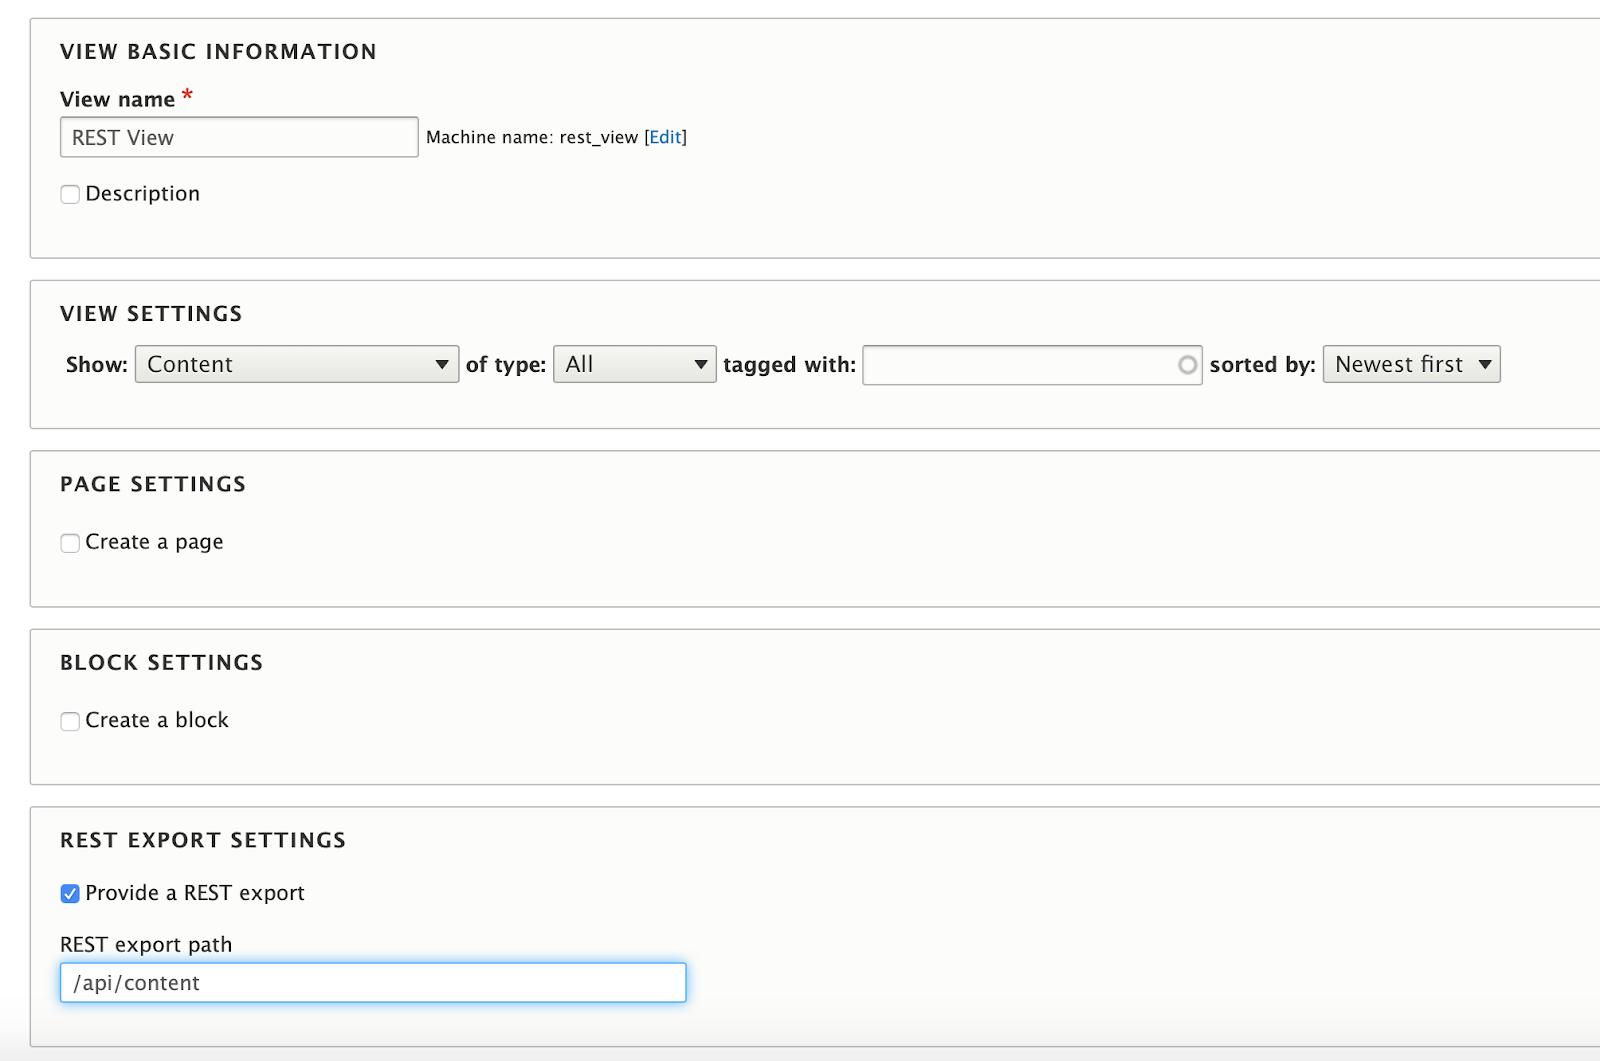
- Set up the REST endpoints for the content you want. Since I’ll just be using pre-defined content types here, all we have to do is go into the “Structure” item on the main menu and then click on “Views”. Once in there, just enter something similar to:
We’re essentially saying: add a new view called “REST View!”, which will show any item of the type “Content” and instead of creating pages or blocks, add a REST Export on the endpoint “/api/content”.
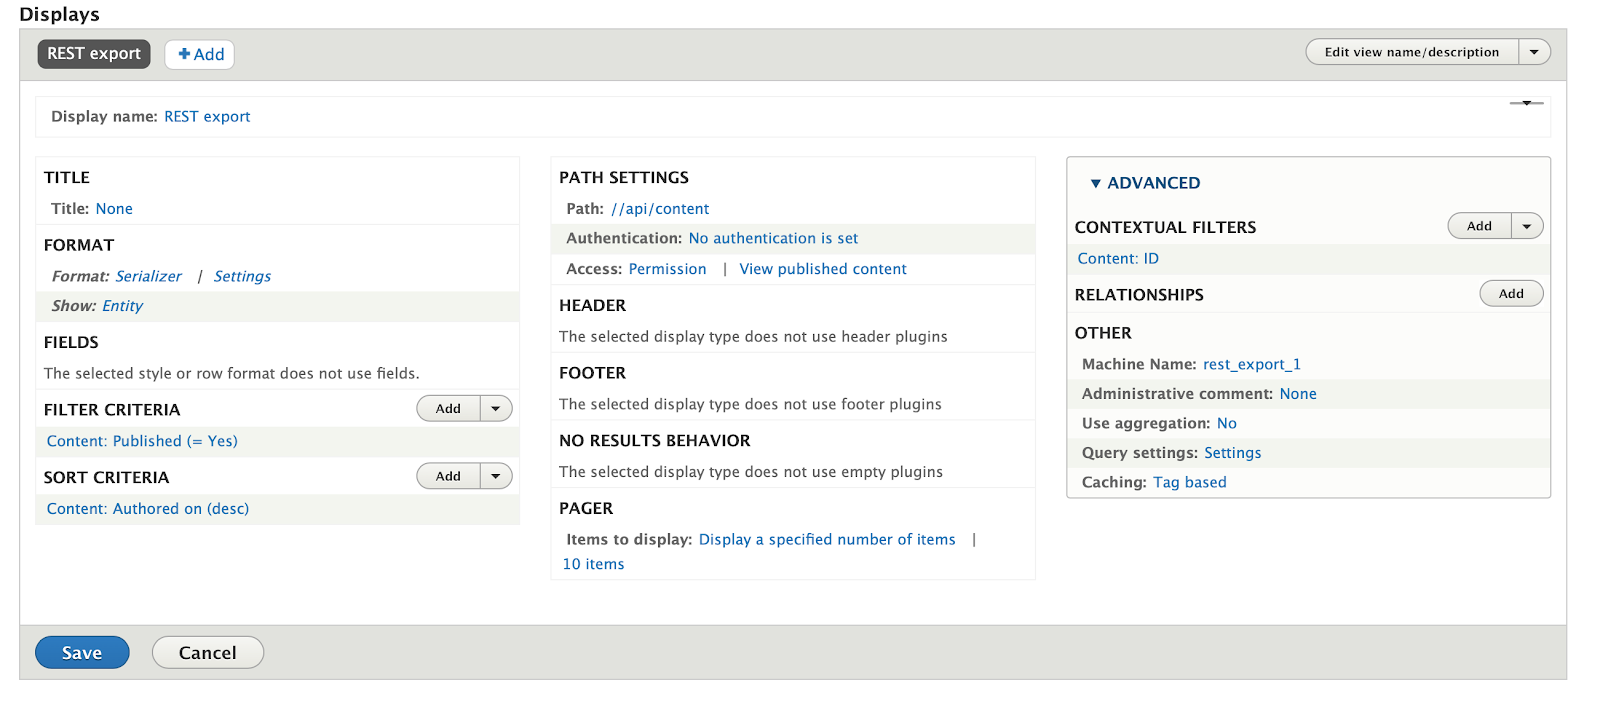
Click on “Save and Edit” and you’ll be redirected to the properties page of this view, just make sure you also add a contextual filter for it, like so:
- Under the “Advanced” section of the page, click on the “Add” button where it says “Contextual filter”.
- Select the one called “ID” (there might be many that have “ID” as part of their name, but make sure you pick the one that only says “ID”).
- Click on the “Save” button and on the next screen, leave everything by default.
With that, you’ve also added the ability to query “/api/content/2” to get the content with ID 2.
Make sure you save the view after this, it should look something like this:
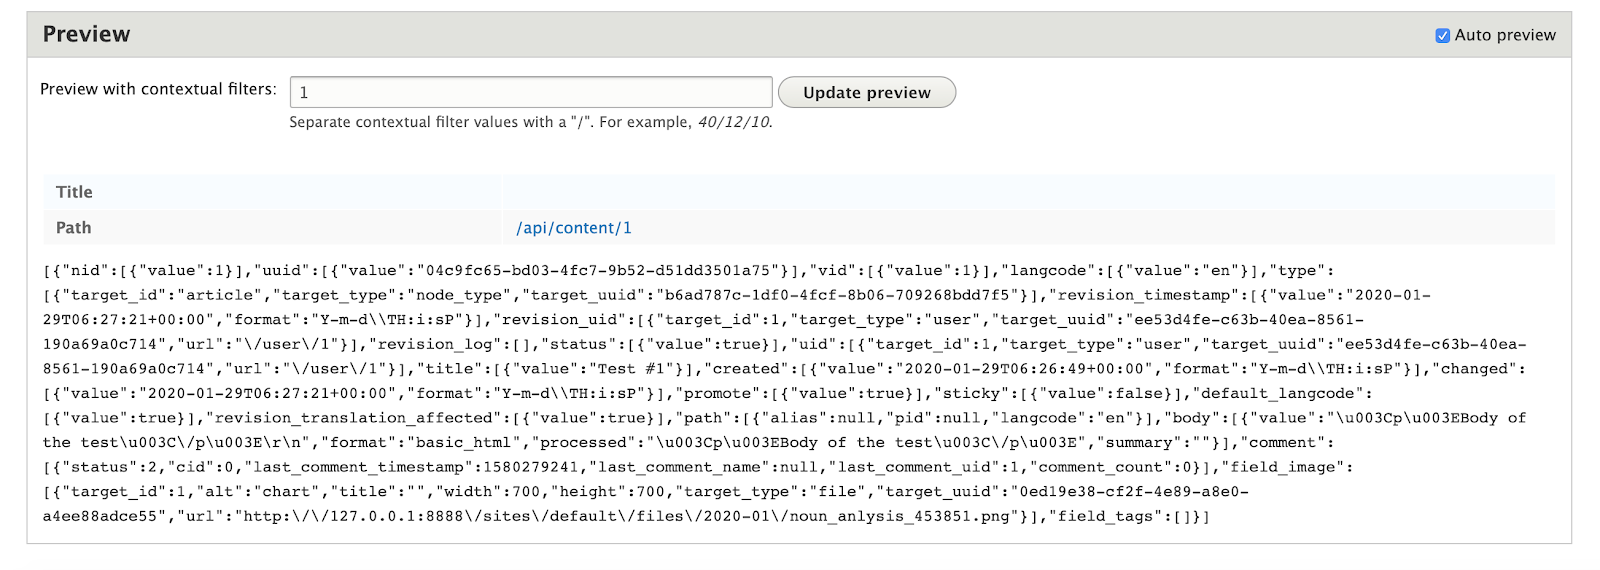
If you have any content, you can use the preview option on this page to check it out. By default, the export will print content in JSON format, so you’ll see something like this:
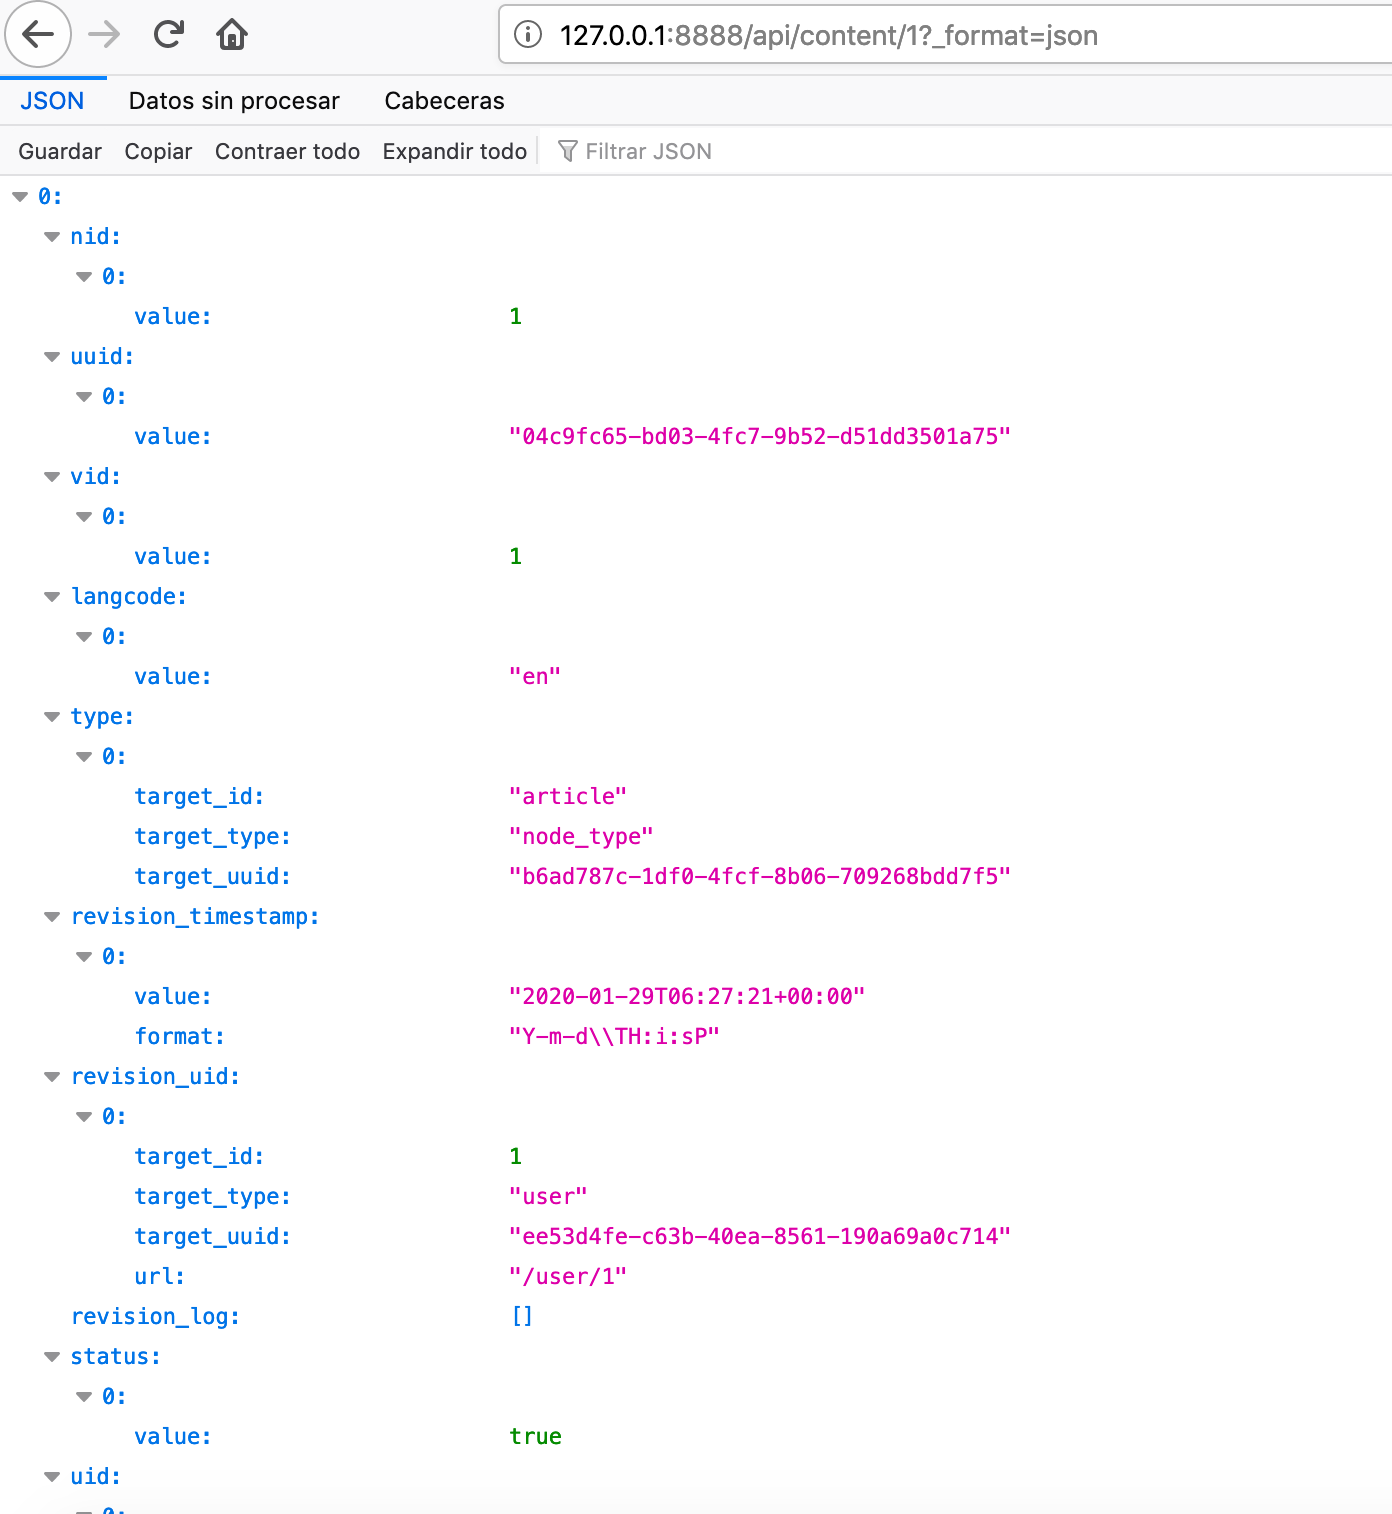
And that is it! You’ve successfully enabled the REST API for Drupal. You can now consume it using that endpoint and adding the _format parameter at the end. This is important, otherwise, you’ll get weird “out of memory” errors.
Here is an example:
Creating a basic app
I’ll show you a basic example of a standard dynamic app you can create using Node.js to consume this API.
Remember the “Classic headless architecture” from above? Well here is the gist of it:
Generating the code
Using express-generator I’ll create a new app like so:
$ npx express test-site
$ cd test-site
$ npm install
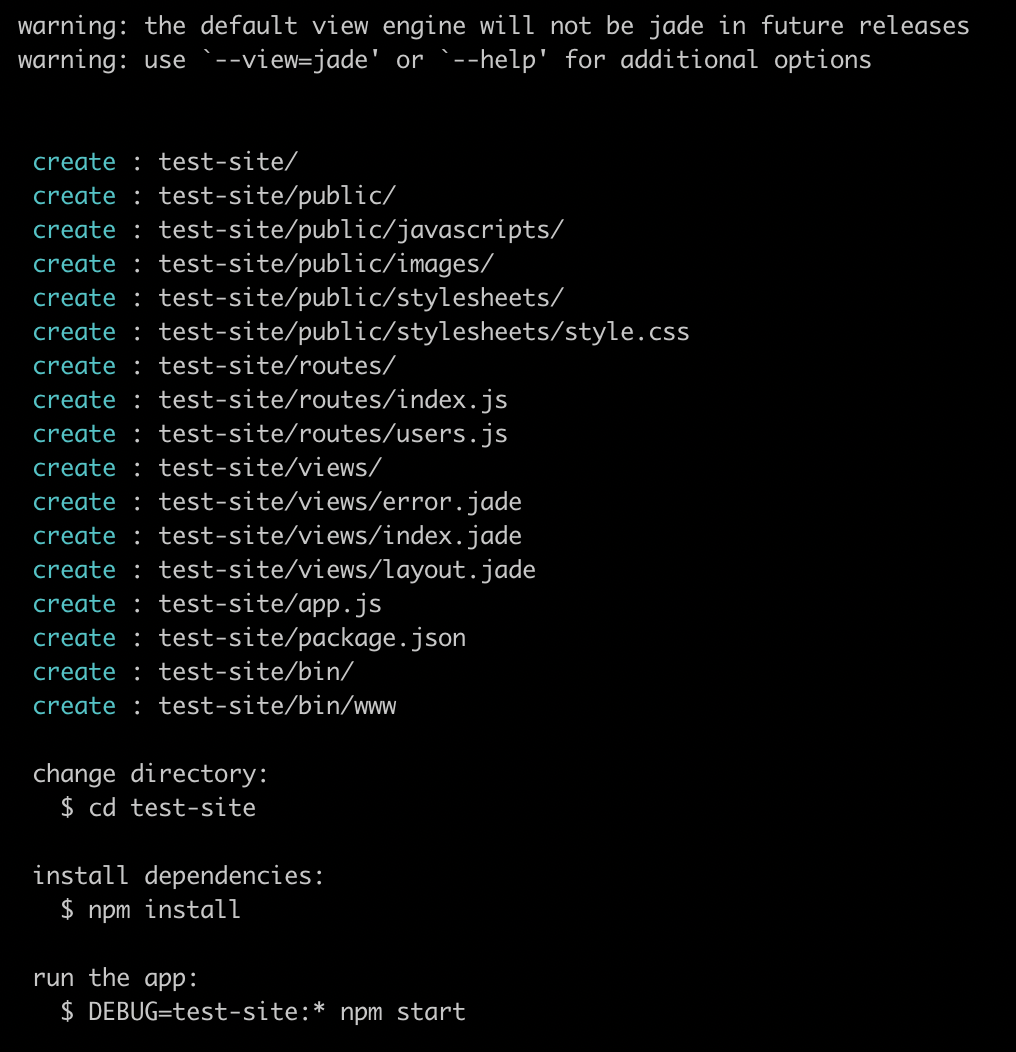
The output from the first command will be something similar to:
And once you have the dependencies installed, you can add the views.
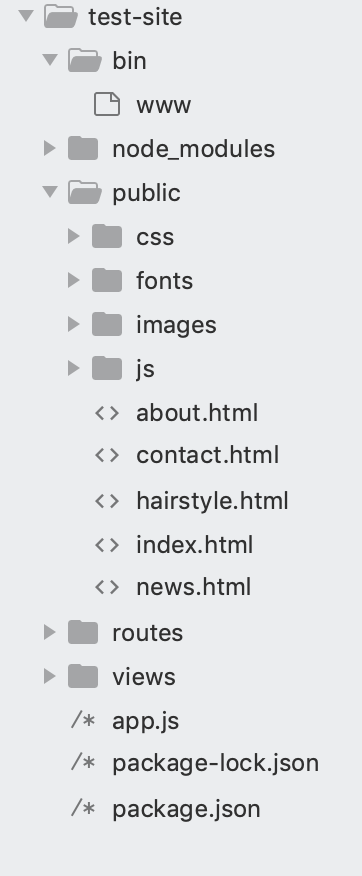
For this particular example, I decided to download a pre-made HTML template that you can find online for free (just search for “free web templates”). Once you’ve found the one you like, copy the entire thing into the “public” folder of this project. The folder structure should look like this:
And in my case, the template looks like this:
For the purposes of this example, I’ll be making those four highlighted images dynamic.
Now, we need to add the front-end code to pull the data from its back-end and the back-end code to pull the data from Drupal.
For the front-end code, I’ll just add jQuery on the page and use that to perform the query since we don’t need anything else. You’re more than welcome to try this with your favorite front-end framework:
Essentially inside the <head> tag, I’ll add:
<script type="text/javascript" src="https://code.jquery.com/jquery-3.4.1.min.js"></script>
    <script>

   	 const loadContent = (container) => {
   		 const url = "http://localhost:3000/highlights?_format=json"
   		 $.ajax({
   			 headers:{
   				 "Access-Control-Allow-Origin": "*",
   				 "content-type": "text/plain"
   			 },
   			 crossDomain: true,
   			 method: "GET",
   			 url: url,
   			 success: (resp) => {
   				 console.log(resp)

   				 let template = "<li><a href=\"\"><img src=\"[IMG]\" alt=\"\"></a><b>best hairstylists</b><p>[DESCRIPTION]</p></li>";

   				 resp.forEach( item => {
   					 const newItem = template
   										 .replace("[IMG]", item.field_image[0].url)
   										 .replace("[DESCRIPTION]", item.body[0].value)
   					 $("#highlights").append(newItem)
   				 })
   			 }
   		 })
   	 }


   	 $(document).ready( _ => {
   		 loadContent($("#highlights"))
   	 })

    </script>
Notice how this code takes care of everything:
- Making sure once the document is ready, it’ll pull the data from our backend api.
- Using the data received to create new HTML elements from a pre-defined template.
- Inserting those new elements into a container.
That’s it, this code doesn't need to do anything else. You’re free to add any extra steps you might require for your particular use case.
On the back-end side, under the “routes” folder I’ve added a new file called “highlights.js”, which will contain the new route that looks like this:
var express = require('express');
var router = express.Router();
const request = require("request")

router.get('/', function(req, res, next) {
  request
      .get("http://localhost:8888/api/content/?_format=json", (err, resp, body) => {
     	 if(err) return res.json(err)
     	 res.json(JSON.parse(body))
      })
});

module.exports = router;
Again, nothing too complex, we’re just using the Request module to perform the REST query to Drupal and redirecting that response back to our client (the front-end).
Then, on the “app.js” file, we need to do a couple of changes:
1. Make sure we add the newly created route:
var highlightsRouter = require('./routes/highlights');
//...
app.use('/highlights', highlightsRouter);
2. Use the Cors module, to enable cross-domain requests (this is to enable requests from the front-end code into the back-end with no issues).
const cors = require("cors")
//...
app.use(cors())And that is it. With these changes, you’re able to have your own dynamic app pulling data from Drupal and using it just as you see fit. Mind you, in this example we’re not doing anything to the data, but you could potentially do anything you wanted before sending it back to the front-end.
I’ve published the full source code on Github in case you’d like to check it out and directly fork it and use it on your project.
The Drawbacks of Headless Drupal
The main drawback of a headless Drupal approach is their documentation. In fact:
- Their “official” documentation wasn’t useful because it skipped required steps (maybe assuming an advanced user might be reading them).
- The fact that you have to follow a set of unclear steps and install dependencies to enable the REST API wasn’t quite clear either.
- And once you have everything set up, you don’t really have much helping (or guiding) you on what you can do with it.
If you’re really interested in going headless you should consider a more dedicated service, such as ButterCMS, where we actually take the time to show you not only how to use the API but also show you practical use cases for each feature.
That being said, there are other issues you might want to consider when deciding on a headless strategy:
More control means more work
Leaving aside the less-than-optimal documentation and assuming you’re now too invested in Drupal to change your mind and decide for a more streamlined option, you need to understand what you’re getting yourself into.
The whole point of going headless is to gain control over the presentation and utilization of the data. The problem with that, however, is that you lose the help Drupal provided (pre-defined templates, routing and so on) and you have to add extra code to achieve your goal.
This is not a problem on teams that already have that kind of know-how. If your team has a developer and visual designer, then you’re good.
If on the other hand, you’re not a developer (nor have one on your team), the headless strategy might not be the best way to go.
"Headless" might be a stretch here
It’s also important to note the difference between an actual headless strategy versus a simple REST API to query data.
A proper headless CMS needs to have an actual API-based strategy for interacting with it, and ideally, it should follow some kind of standard to improve the user experience and help with adoption. One example would be having a REST interface, something resource-based that would have a focus on the content.
Some features to look for from a proper API-based interface for a true headless experience would be:
- Authentication: You want to be able to authenticate the requests hitting the CMS and querying or trying to interact with your content.
- Ability to query the content you created: This is a basic one, but the key here is that content needs to be king. The way in which you query content and also the format of the response needs to be clear and easy to consume.
- Ability to add content through this API: This is an often overlooked feature, as crazy as that might sound, but adding the ability to add content through the API is what makes a true headless CMS.
- Ability to query the content using its properties (such as tags, categories, etc): It’s important to understand that querying the list of content or even a single content for you to render somehow is not enough, you should be able to filter it using common content properties such as category, tags or topics.
Unfortunately, Drupal’s headless strategy excludes these key API-based strategies. You only need to set up a few things and you can query the content you added but that’s pretty much it.
With ButterCMS, you can see how to use a truly headless CMS to create a customized content management UI (something you might need if you want to have full control over your process).
The basic features will only get you so far
Finally, with Drupal’s REST API you’re only getting the basic data you need in order to create a custom UI. If that’s all you want, that’s all you need. However, if you’re trying out a headless strategy, that might not be you.
The data returned by Drupal’s API is:
- Not really content-focused, at least not from the perspective of a human consumer trying to make heads and tails from it.
- Barely understandable if you’re not privy to Drupal’s internal data structure. It requires you to understand what a node is and how that concept maps to your content.
Don’t get me wrong, that data is more than enough for you to create a custom representation (it’s exactly what I did in this article, after all), but if you’re looking for a better dev-experience or a more feature-rich option, then Drupal is probably not for you.
Here you can see how Drupal compares to an actual headless CMS such as ButterCMS.
Conclusion
Headless CMS is nothing but a response to the current evolution of the content-management and content-exploitation paradigms. Being able to send and render content on many platforms at the same time is becoming a requirement for any business and making use of that data in other forms other than simple presentation is also becoming more common every day.
I hope that through this article I’ve been able to show you how easy it is to add this capability to your Drupal sites and why going headless is likely a requirement for your future, modern apps.
Feel free to leave a comment below if there are any questions or if you’ve managed to find a simpler way to enable the REST interface for Drupal 8.
Have a good one!
Do you want your product or marketing team to test Butter CMS? We can set up a live demo to walk your team through the fast, easy-to-use interface.
ButterCMS is the #1 rated Headless CMS
Related articles
Don’t miss a single post
Get our latest articles, stay updated!





Fernando Doglio has been working as a Web Developer for the past 10 years. In that time, he's come to love the web, and has had the opportunity of working with most of the leading technologies at the time, suchs as PHP, Ruby on Rails, MySQL, Node.js, Angular.js, AJAX, REST APIs and others. He can be contacted on twitter at: @deleteman123 or you can read more about him and his work at www.fdoglio.com