- Why use Rails?
- Why use ButterCMS?
- Rails landing page tutorial prerequisites
- Setting up the Rails project
- Installing dependencies
- Setting up our landing page in ButterCMS
- Creating components for the landing page
- Adding the components to the landing page
- Integrating the components in Rails
- Creating a navigation menu with collections
- Creating the testimonial section
- Closing thoughts
GSD
How to Build a Rails Landing Page Using ButterCMS as Your Content Backend
Posted by Deborah Emeni on September 15, 2023
As an application scales, managing landing page content without affecting its code can be a hassle for developers and non-technical users. Luckily, a headless CMS like ButterCMS exists to save developers and non-technical users from the stress of managing the content of an application. ButterCMS separates the content from the presentation layer and offers several features that make it an excellent choice for building landing pages.
In this article, you will learn how to build and add a landing page to a Rails application using ButterCMS.
Table of contents
Why use Rails?
Rails is a popular open-source Ruby framework with pre-built features that allow for the quick and easy development of a wide range of dynamic applications, including landing pages. Rails is a perfect tool for providing a clean code structure, integration with third-party tools, and a testing framework for quickly building landing pages.
It also includes features such as templates, which allow you to quickly create reusable layouts and views for your landing page. It also includes a routing feature, which allows you to define the structure of your landing page with URLs and map them to routes, directing users to the appropriate pages such as About or Pricing pages.
Why use ButterCMS?
ButterCMS is a headless CMS with built-in libraries that integrates easily with any programming language such as Rails. ButterCMS has features and several benefits, making it an excellent tool for easily building landing pages. Some of these features include:
-
Collections: ButterCMS provides collections that allow you to easily create, edit, delete, and update data that is displayed on multiple pages via a single instance.
-
Components: By allowing you to create reusable content, ButterCMS components allow you to save time and effort while maintaining consistency across your landing pages.
-
Page types: Page types are a powerful and user-friendly feature in ButterCMS that allows you to create custom templates for your landing pages.
-
Customizable content modeling: Using custom components, amongst many other features in ButterCMS, you can easily tailor the content of your landing page to meet your specific requirements with ButterCMS.

Rails landing page tutorial prerequisites
To follow along with this tutorial, you will need the following:
-
A basic understanding of Rails and Ruby
-
A code editor (Visual Studio Code editor)
-
Ruby installed
-
Rails installed
-
Access to a terminal
Setting up the Rails project
Before you begin, ensure that you have rails installed by entering the following command into your terminal:
rails -v
The command should output the version of Rails you have installed:

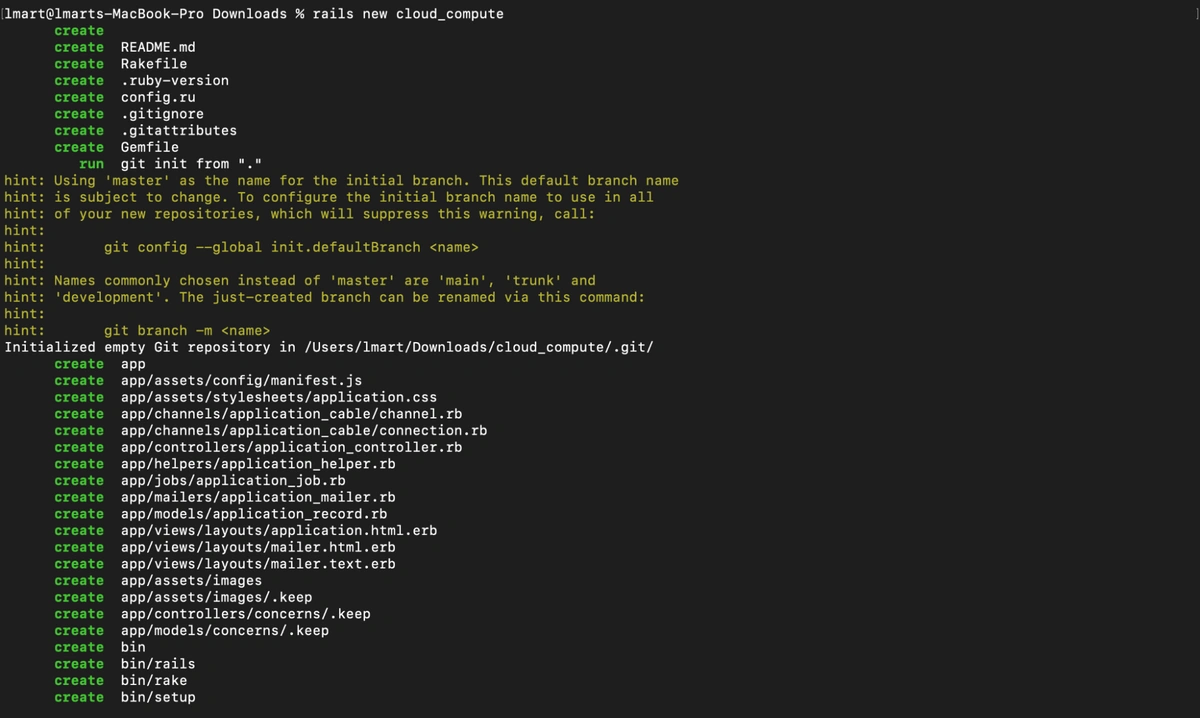
Let’s create a Rails project called “cloud_compute” with this command:
rails new cloud_compute
The command above will create a Rails project locally and set up a git repository for it:
Change into the directory of the project with this command:
cd cloud_compute
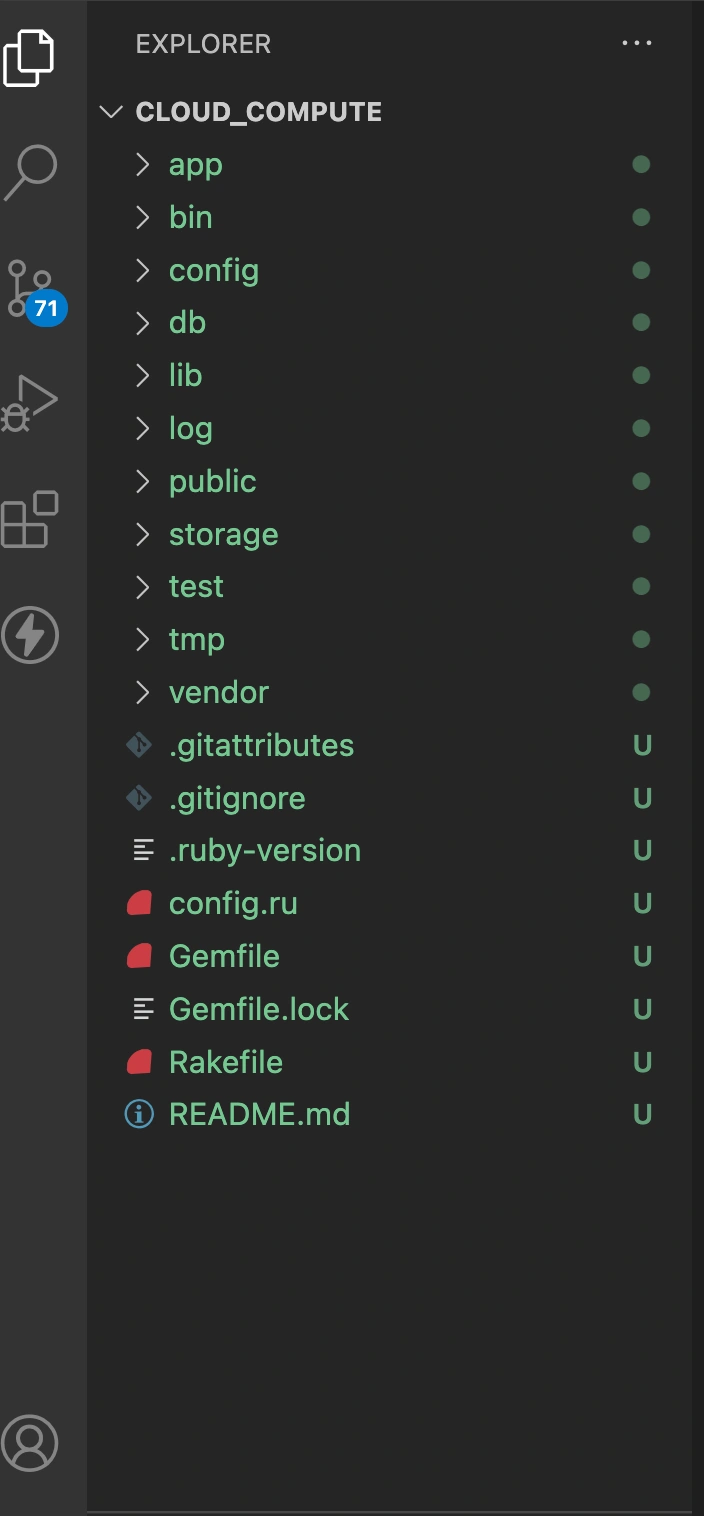
Open the project in your code editor and you should see the Rails-generated folder structure:
Installing dependencies
For our project, we'll need the ButterCMS SDK and dotenv. Include the following dependencies in your project's Gemfile:
gem 'dotenv-rails', groups: [:development, :test]

# ButterCMS Rails SDK [https://github.com/buttercms/buttercms-ruby]
gem 'buttercms-ruby', '~> 2.3'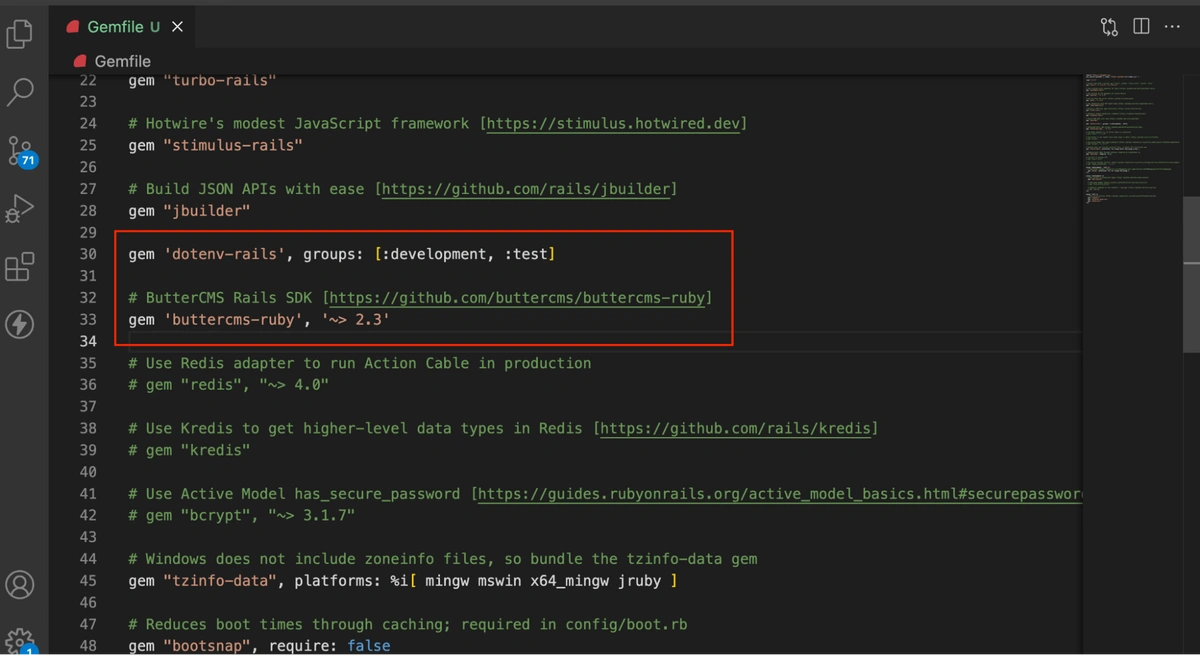
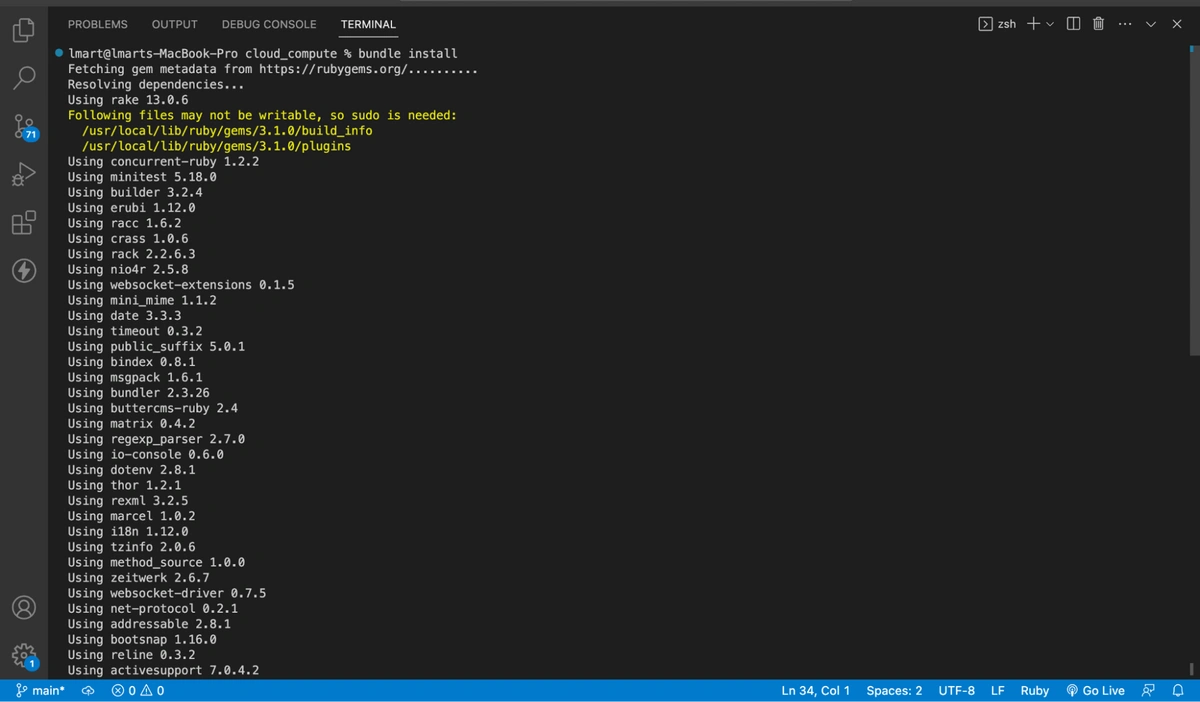
Run the following command within your project directory to install the dependencies:
bundle install
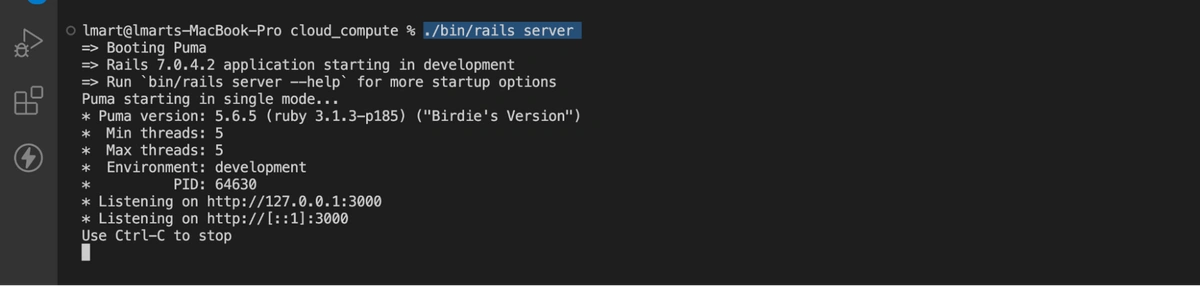
To start the development server, run:
./bin/rails server
Afterwards, the following will be displayed in your terminal:
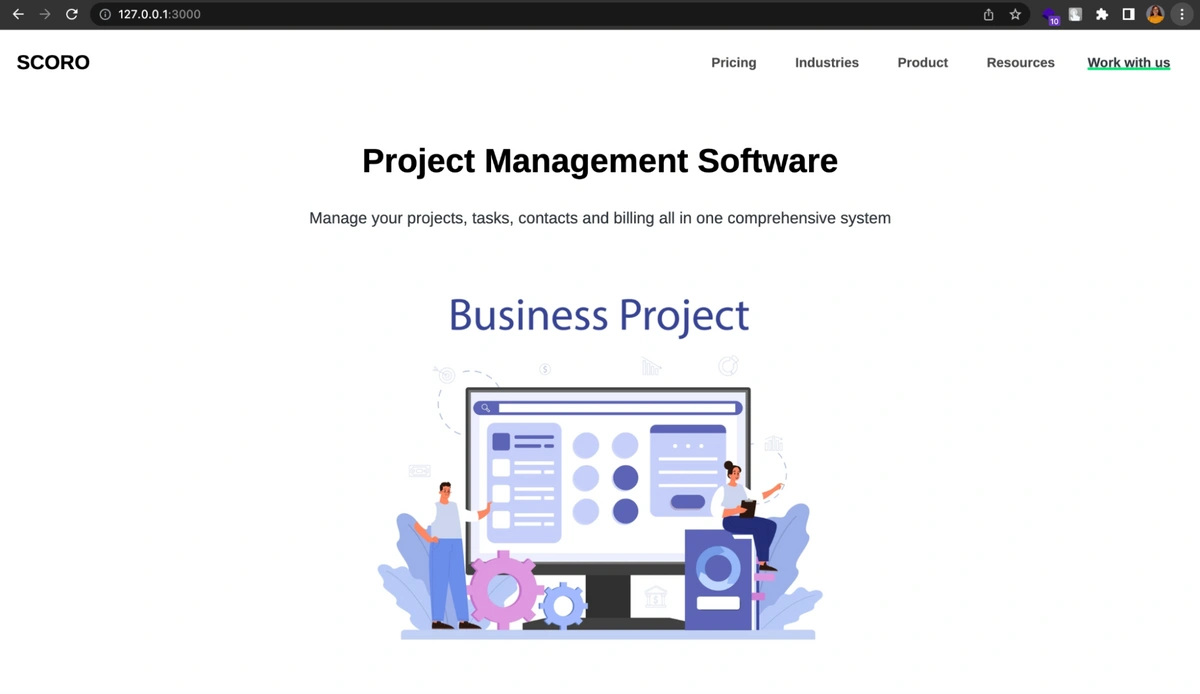
Confirm that your application is running by navigating to this URL: http://127.0.0.1:3000/

Setting up our landing page in ButterCMS
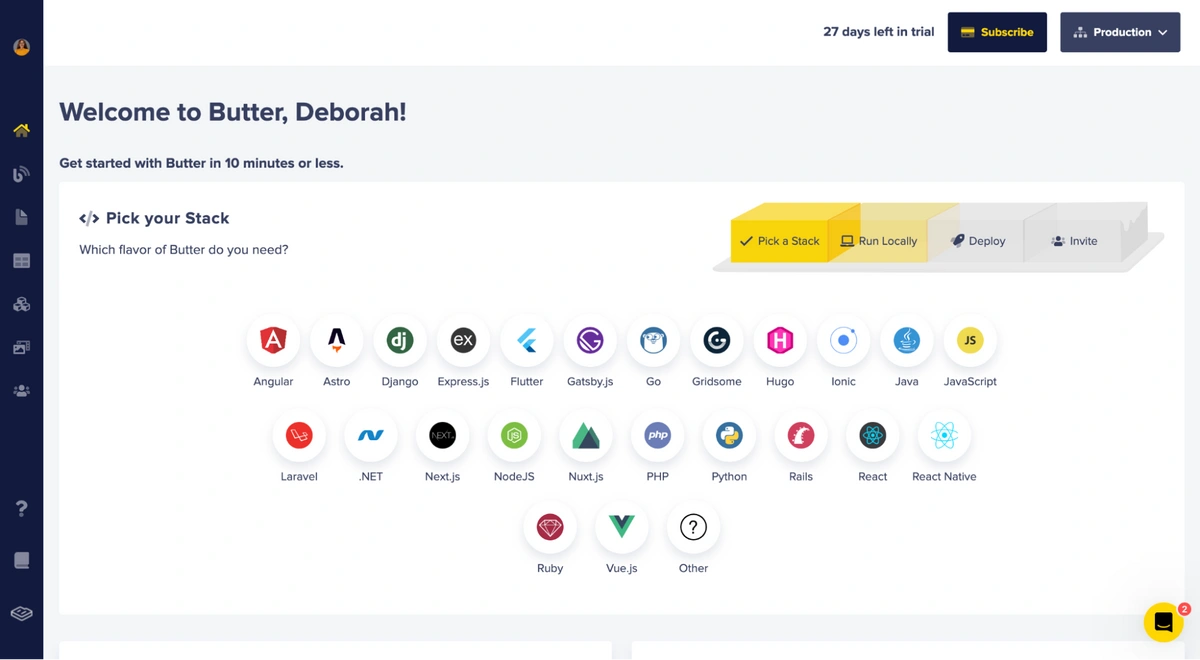
To create a landing page in ButterCMS, you must first create an account. Go to the ButterCMS website and select Get Started. You can sign up using your Google, GitHub, or Microsoft account.
After you sign in, you'll be able to access your ButterCMS dashboard:
ButterCMS has many stacks to choose from. We'll be using Rails for this tutorial. When you click Rails, you will be taken to a page with a list of commands to get started with ButterCMS using Rails:
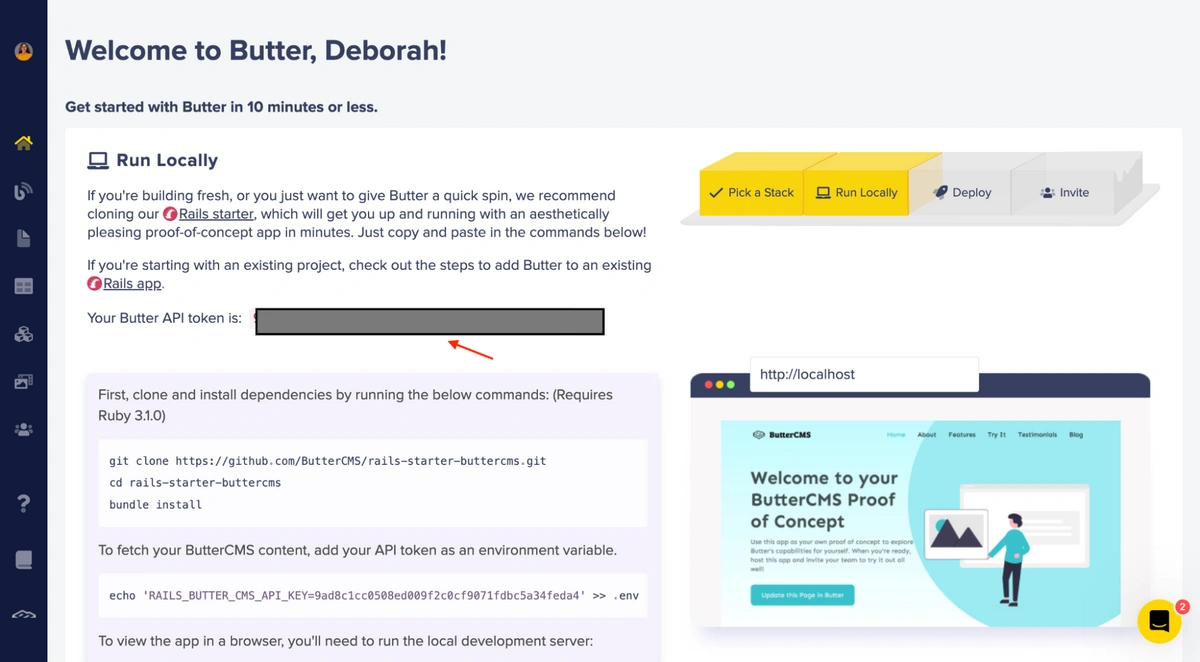
Next, copy your Butter API token from your dashboard and paste it into a .env file in the project's root directory as follows:
BUTTER_API_TOKEN=<Your API Token>
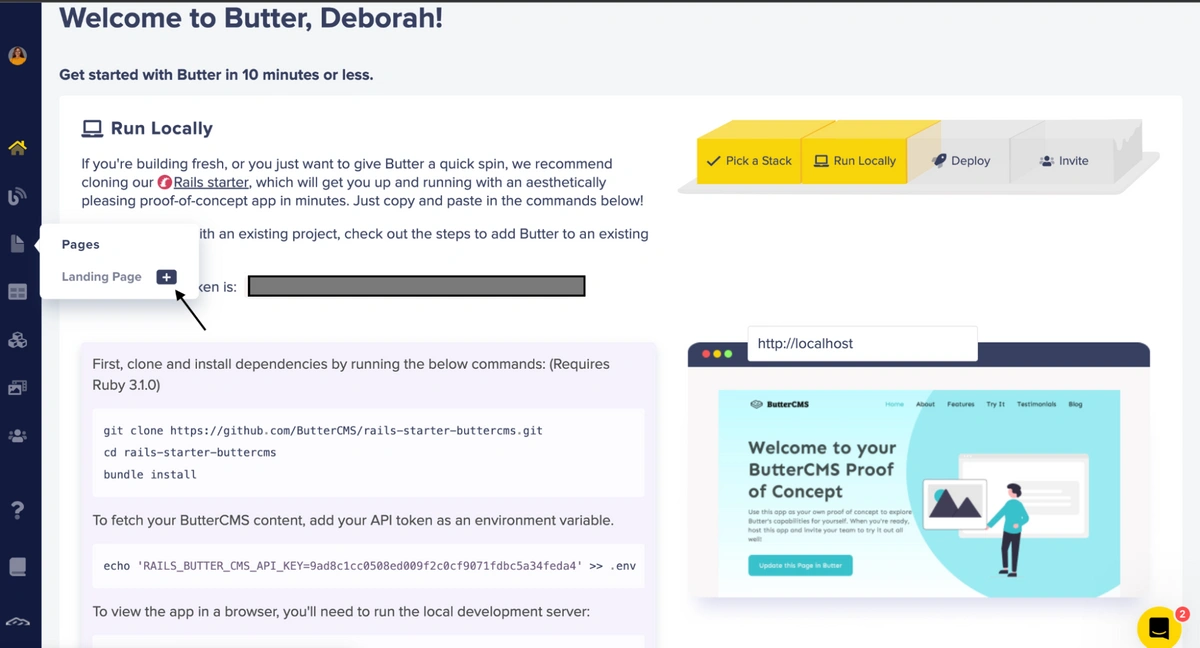
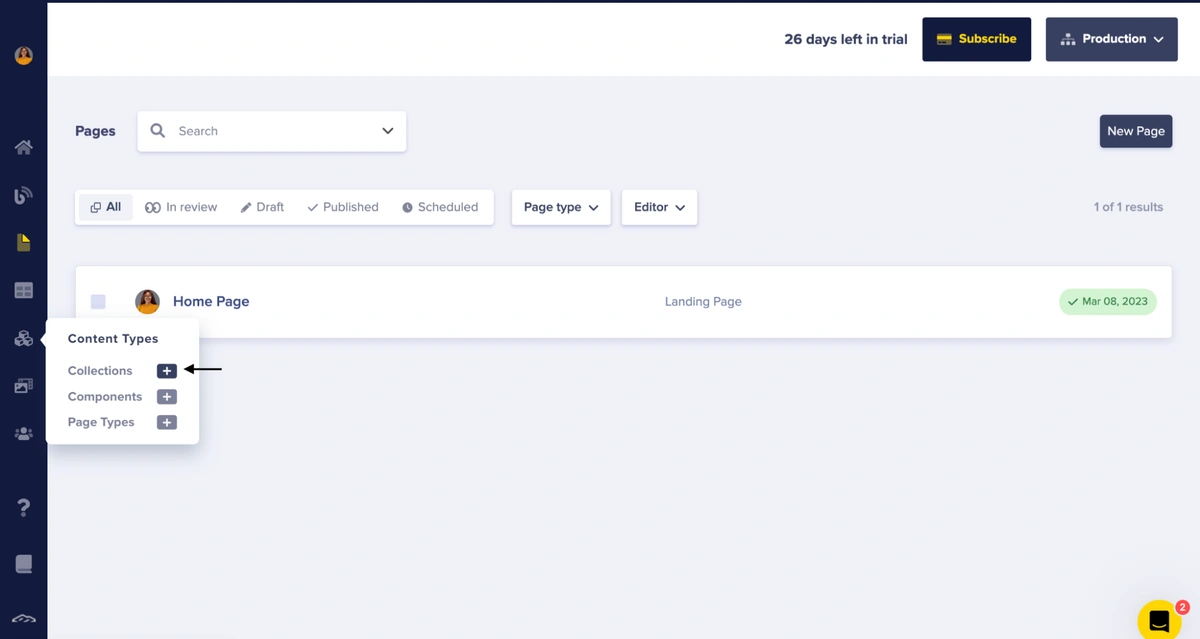
For this tutorial, we are using a preconfigured page provided by ButterCMS. However, you can create your own custom pages from scratch. To create our landing page, go to the Pages tab in the sidebar and click the "+" icon next to the Landing Page option:
After clicking the "+" icon, enter your page title as Home Page, and an API slug will be generated for you to access your page:
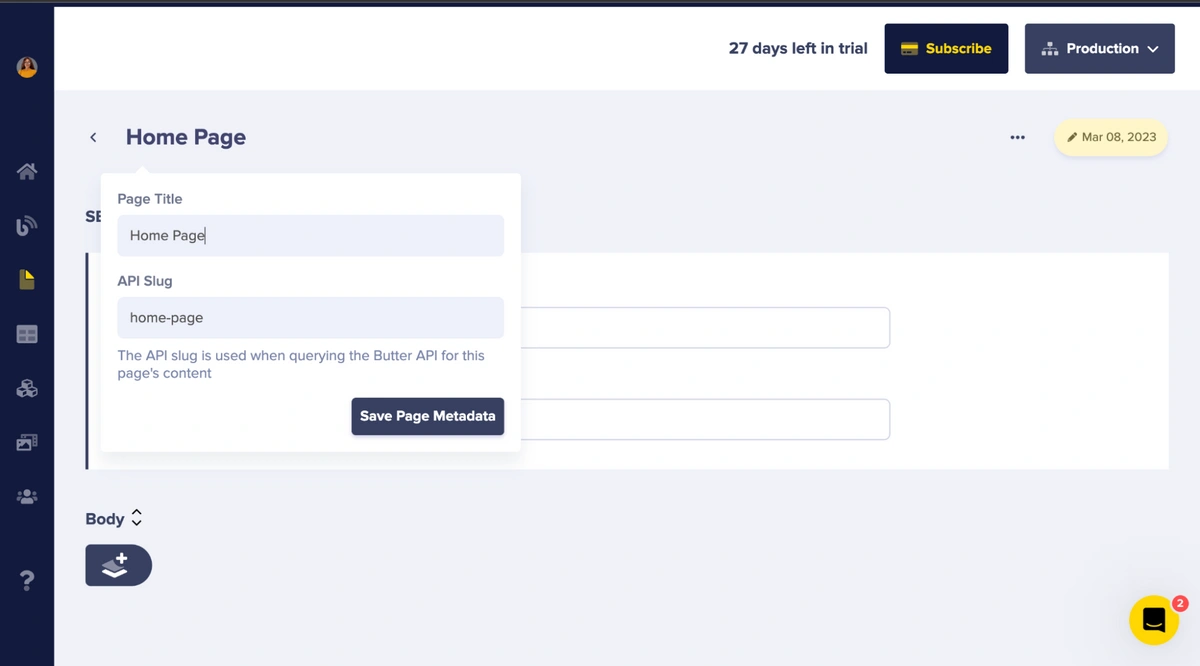
Next, click the Save Page Metadata button. After that, enter your SEO title and description for the page, then click the Publish button.
Creating components for the landing page
ButterCMS lets you create various types of components such as hero and features components. This tutorial will demonstrate the creation of customized components such as features, the hero, and testimonials. Let's begin by creating the Features component.
Creating the Features component
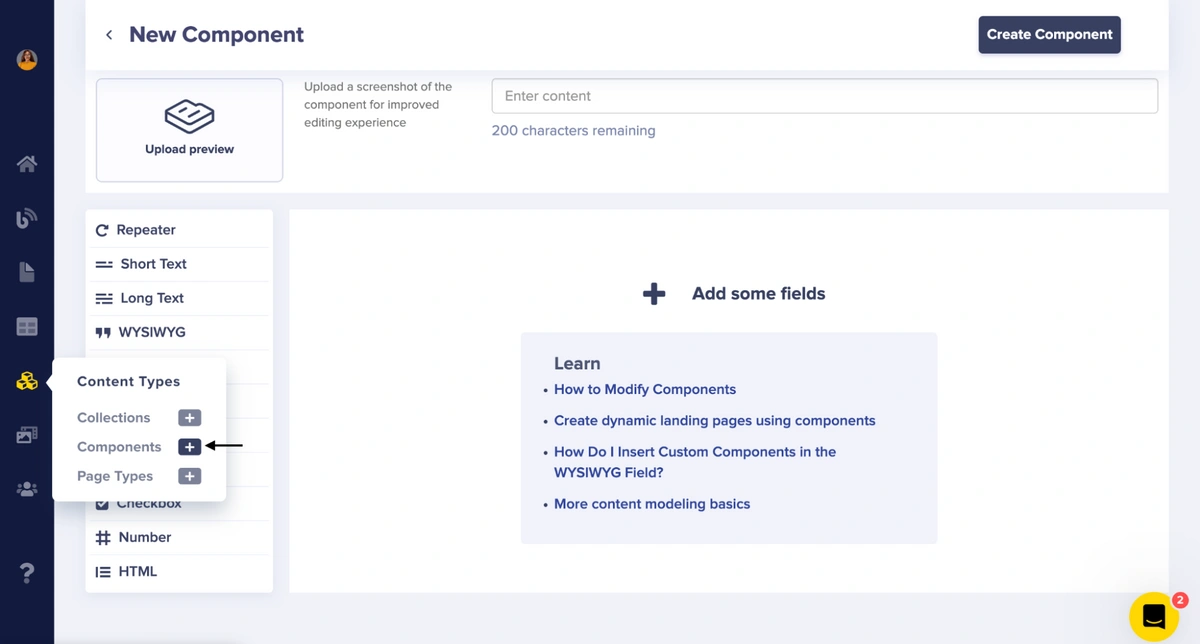
Navigate to the Content Types tab in your dashboard's sidebar and click the "+" icon next to Components:
A page will be displayed where you can add a description for your component and select the fields you want to add to it. For the Features component, select the following fields:
-
Short Text field: Headline
-
Long Text field: Sub-headline
-
Repeater field: Features with the following fields:
-
Short Text: Headline
-
Long Text: Description
-
Media: Icon
-
Short Text field: Scroll anchor ID
The screenshot below shows how the fields should be organized:

Next, click the Create Component button to save your component as Features. After that, you'll be prompted to name your component. Simultaneously, an API key will be generated for you, which you will use to query the Butter API for the component's content. Then, click Save Component Metadata:

Creating the Hero component
Return to the Content Types tab and select the Components option by clicking the "+" icon:
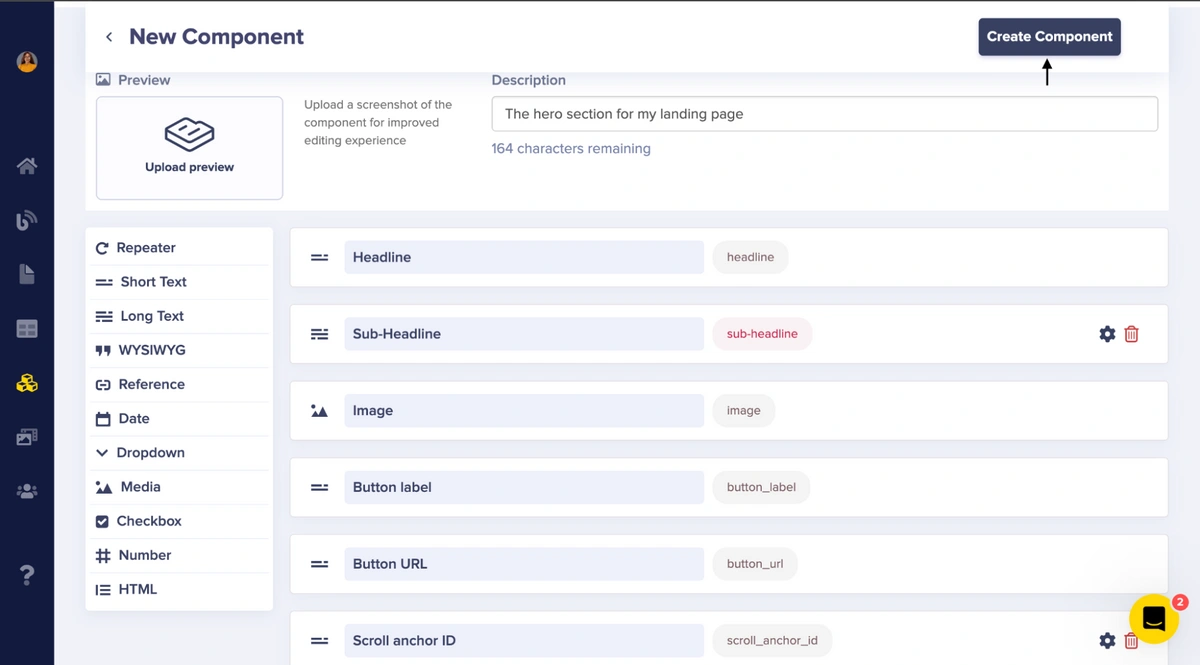
Let’s create the Hero component with the following fields:
-
Short Text field: Headline
-
Long Text field: Sub-headline
-
Media field: Image
-
Short Text field: Button label
-
Short Text field: Button URL
-
Short Text field: Scroll anchor ID
Enter these fields and click Create Component:
Then, enter "Hero" as the component name and click Save Component Metadata.
Adding the components to the landing page
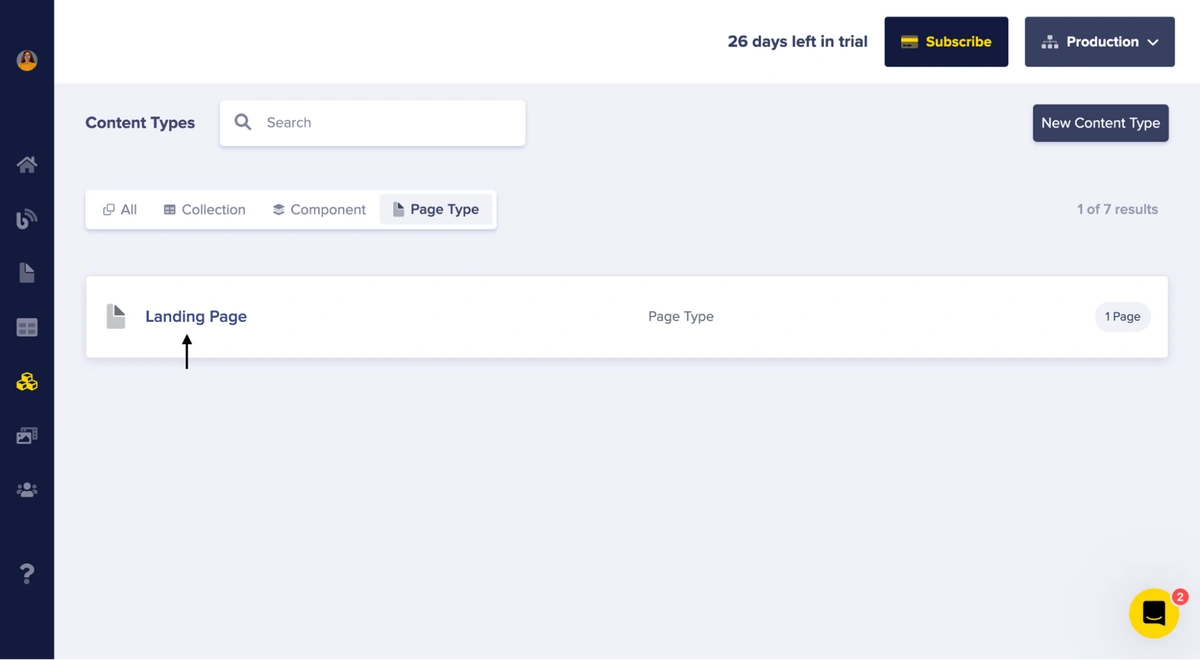
Moving forward, we need to add the newly created components to our landing page. We’ll do that by editing the schema of the landing page’s page type. Select Page Types from the Content Types tab in the sidebar:

Then, select the Landing Page type that came pre-built by ButterCMS:
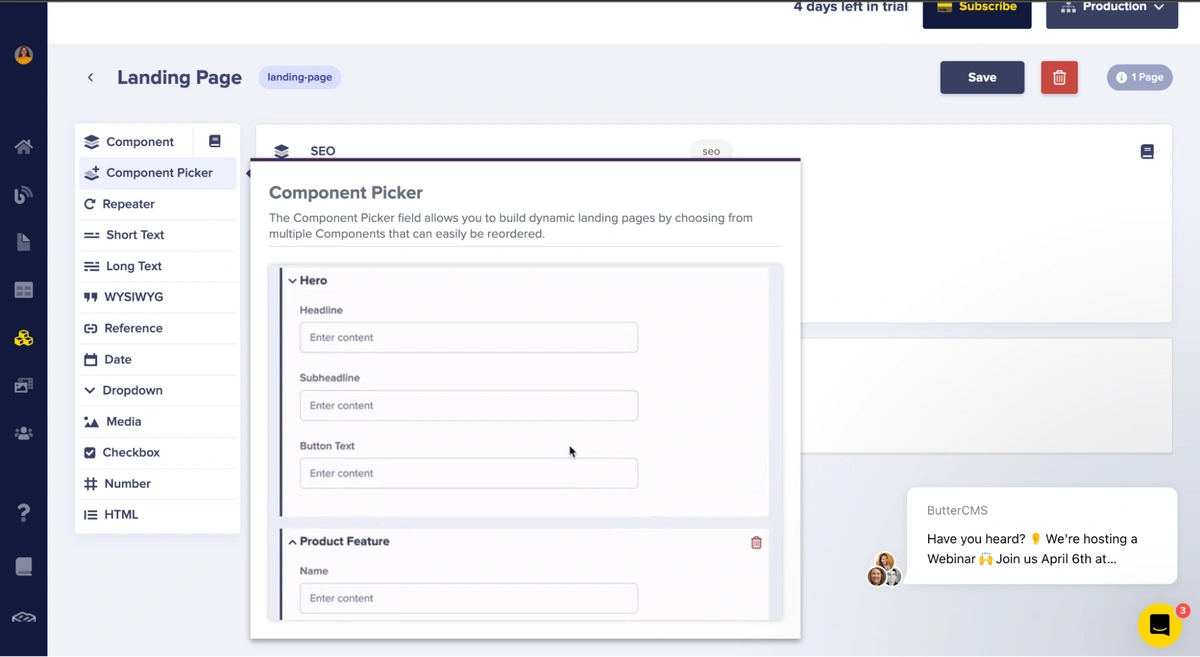
To add the components to the landing page, click the Component Picker:
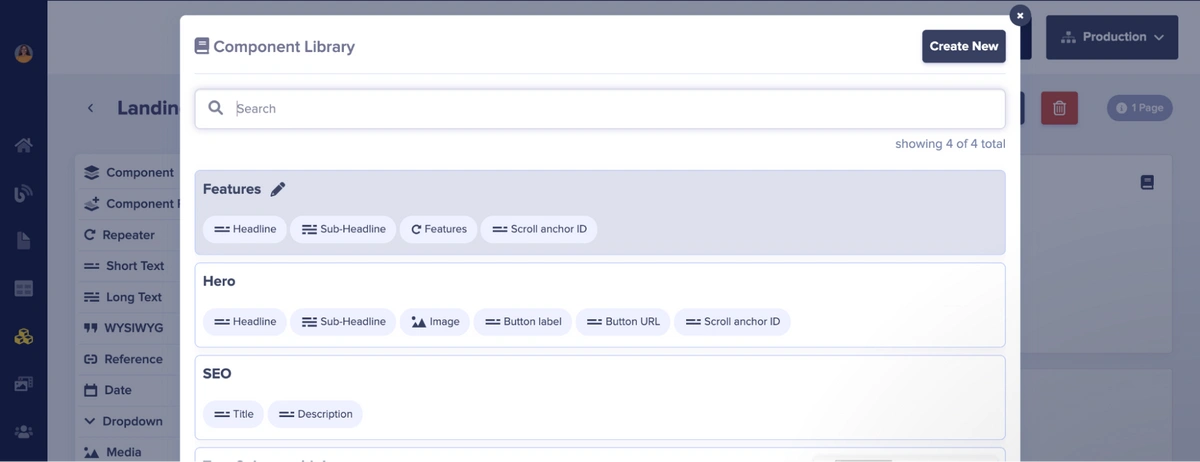
Then, click the Add from Library button.
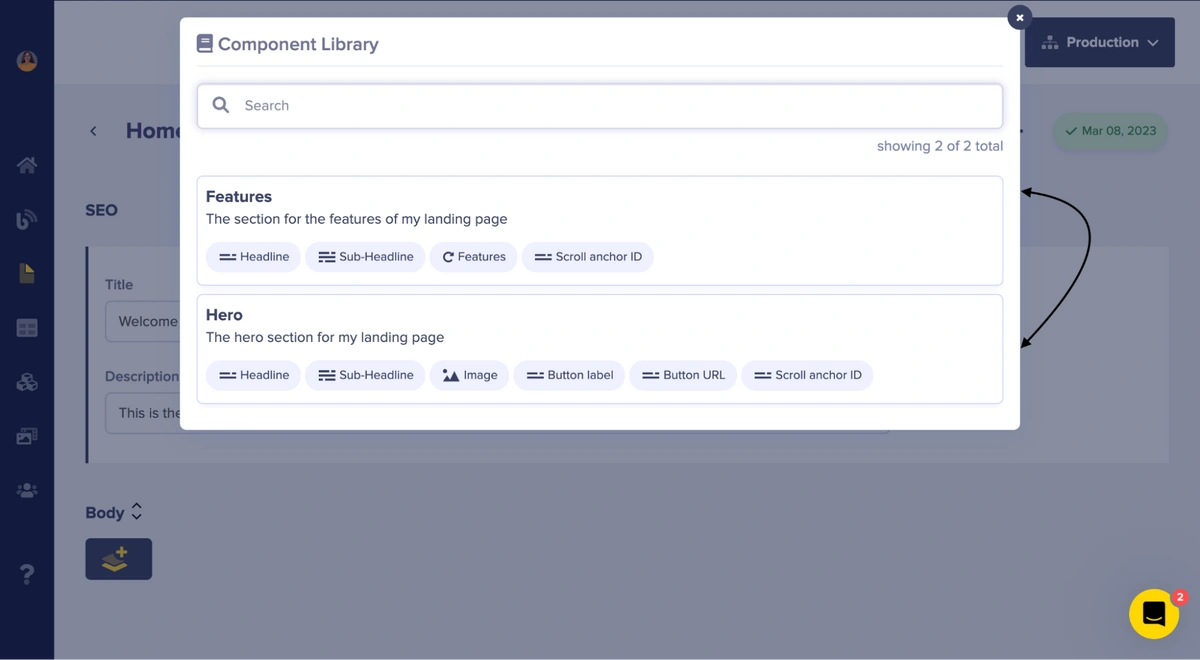
Afterwards, the Component Library will be opened for you to select the Hero and Features components. Then, click on Save:
Your Hero and Features components will be added. Then, click the Save button in the top right corner.
Return to the Pages tab in the sidebar and select the Home Page created with the Landing page type:

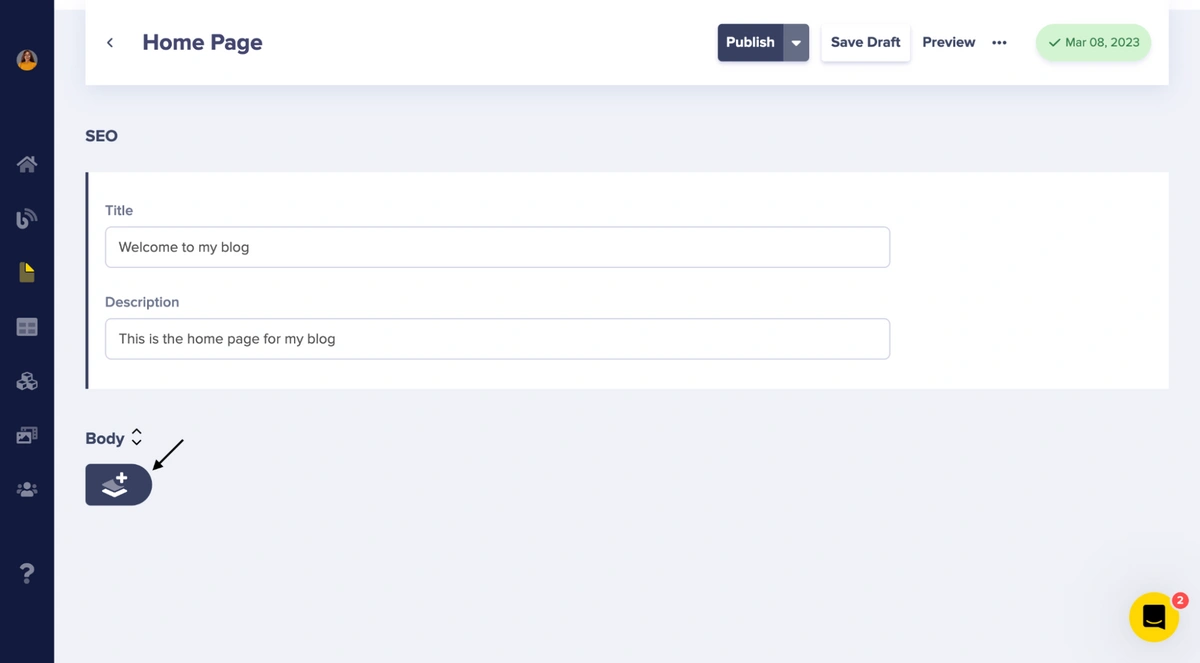
When you open the Home Page, click the component picker "+" button under the Body tab to see and select the components we created in the component library:
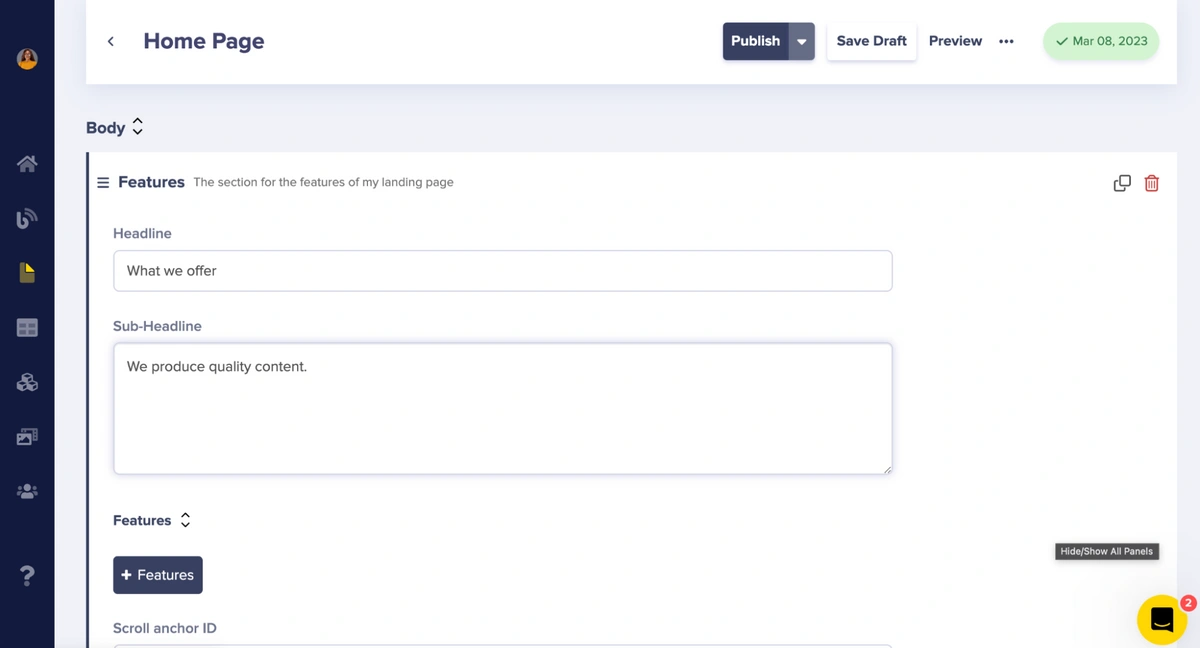
Then, select the Features column to add details to the component:
Fill in the details for both the Headline and Subheader fields in the Features components:
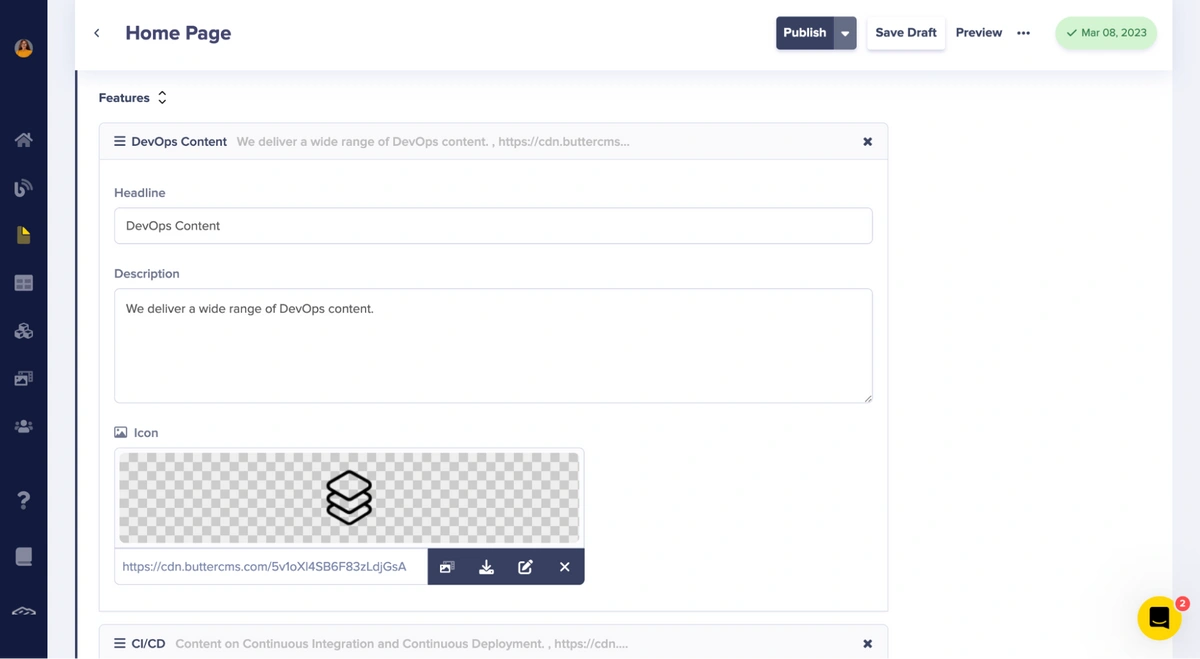
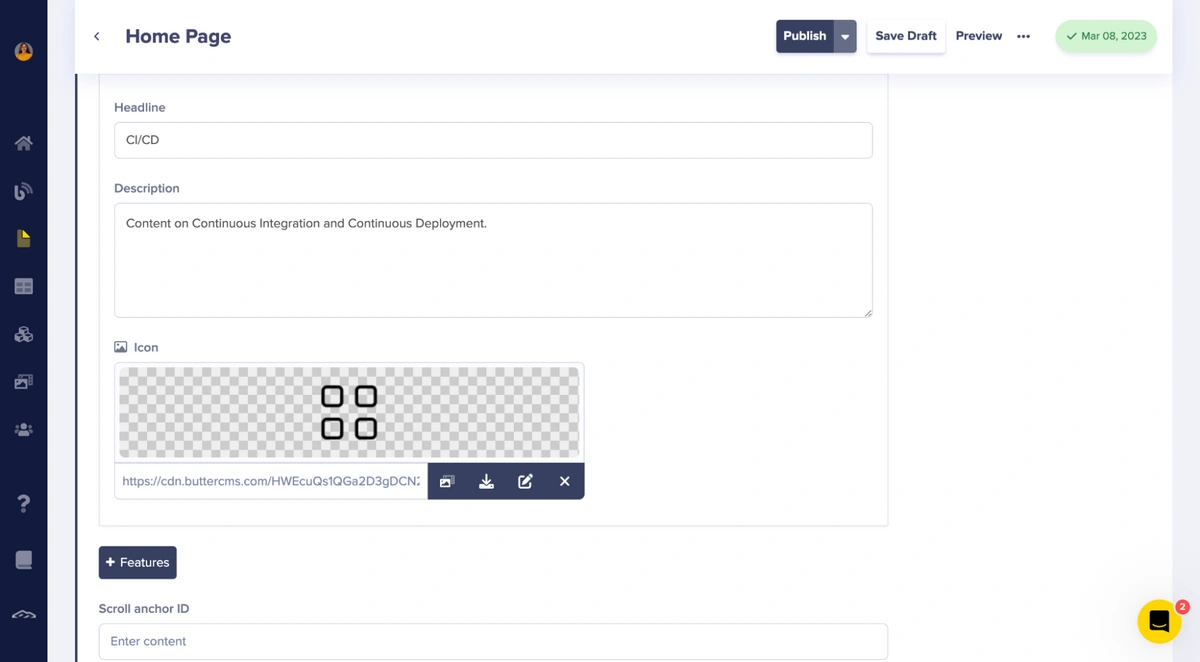
Next, we need to add items to the repeater. To do this, click the “+ Features” button. Here, we will add two features with a headline text, description, and icon:
Next, click the component picker "+" button again. Select the Hero component, then add your details to the fields within the Hero component.
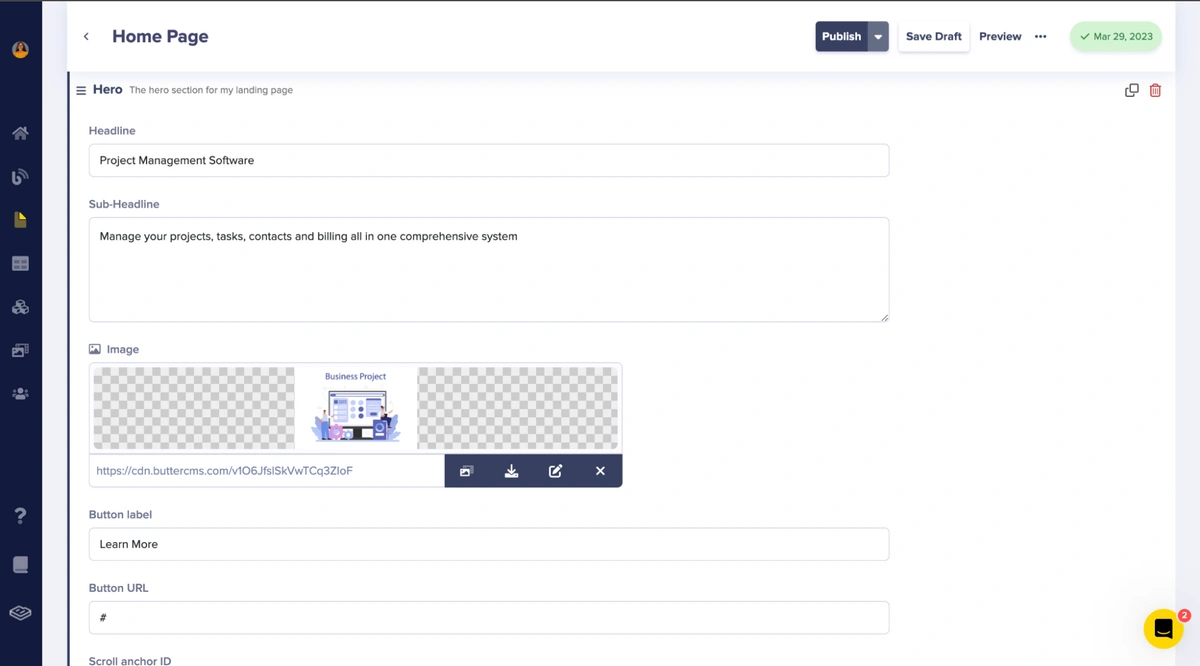
Save the changes you've made to make the API available on the page by clicking the Publish button at the top of the page.
Integrating the components in Rails
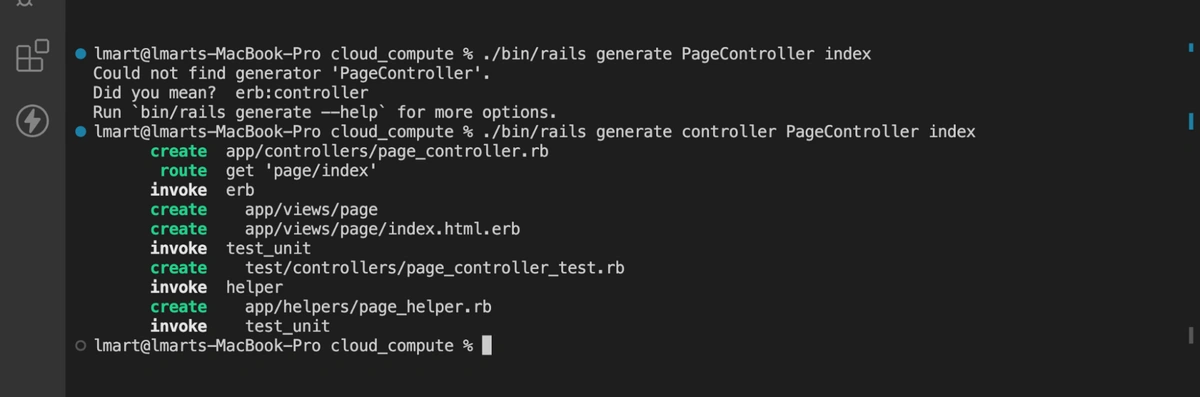
Let’s add the components to our Rails application. Before that, we need to set up the PageController to generate a controller, view, and route for our application with this command:
./bin/rails generate controller PageController index
Afterwards, the following will be generated:
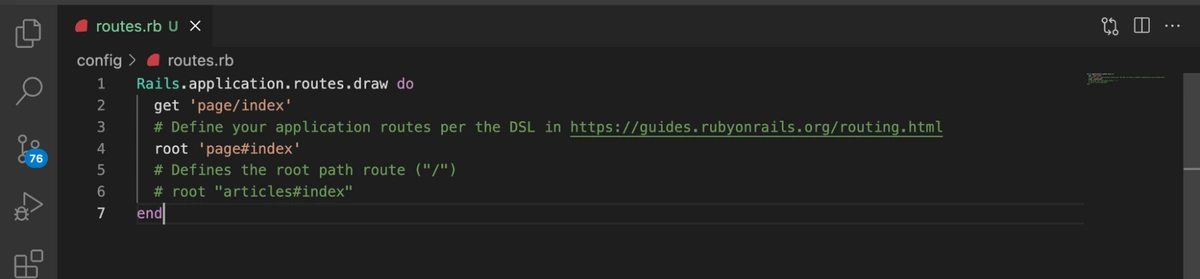
Let’s set the route for the home page by navigating to the routes.rb file and adding this line:
root 'page#index'
Next, add the code that fetches the content of the home page from ButterCMS. Go to your app's controllers/page controller.rb file and add the following:
require 'buttercms-ruby'
ButterCMS::api_token = ENV["BUTTER_API_TOKEN"]


class PageController < ApplicationController


 def index
   slug = params[:slug] || 'home-page'
   params = {
     "page": 1,
     "page_size": 10,
     "preview": 1
   }


   page = ButterCMS::Page.get('*', slug)
   content = ButterCMS::Content.list('menu')


   @page = page.data
   @our_offer = page.data.fields.body.find { |obj| obj.type == "features" }
   @hero = page.data.fields.body.find { |obj| obj.type == "hero" }
   @menu = content.items.first.data[1].first.menu_items


   rescue ActionView::Template::Error => e
     raise ButterCmsError::MissingComponentPartial, e
   end


   def not_found
     render '404', layout: false
   end
 end
Next, replace the following code in the app/views/ layouts/application.html.erb file with:
<!doctype html>
<html lang="en">
   <head>
       <!-- Required meta tags -->
       <meta charset="utf-8">
       <meta name="viewport" content="width=device-width, initial-scale=1, shrink-to-fit=no">
       <title><%= @page.fields.seo.title %></title>
       <meta name="description" content="<%= @page.fields.seo.description %>" />
       <%= csrf_meta_tags %>
       <%= csp_meta_tag %>


       <!--Google fonts-->
       <link href="https://fonts.googleapis.com/css?family=Arimo:400,400i,700,700i" rel="stylesheet">


       <!--vendors styles-->
       <link rel="stylesheet" href="https://cdnjs.cloudflare.com/ajax/libs/font-awesome/4.7.0/css/font-awesome.min.css">


       <!-- Bootstrap CSS / Color Scheme -->
       <%= stylesheet_link_tag "default", "data-turbo-track": "reload", "id": "theme-color" %>
       <%= stylesheet_link_tag "application", "data-turbo-track": "reload" %>
   </head>
   <body>
     <%= yield %>


     <!-- jQuery first, then Popper.js, then Bootstrap JS -->
     <script src="https://code.jquery.com/jquery-3.2.1.min.js"></script>
     <script src="https://cdnjs.cloudflare.com/ajax/libs/popper.js/1.12.9/umd/popper.min.js"></script>
     <script src="https://maxcdn.bootstrapcdn.com/bootstrap/4.0.0/js/bootstrap.min.js"></script>
     <script src="https://cdnjs.cloudflare.com/ajax/libs/feather-icons/4.5.0/feather.min.js"></script>
     <%= javascript_include_tag "scripts" %>
   </body>
</html>
Next, navigate to app/views/page/index.html.erb and insert the following code:
<!--hero header-->
<section class="pt-7 pt-md-8" id="home">
<div class="container">
<div class="row">
<div class="col-md-8 mx-auto my-auto text-center">
<h1><%= @hero.fields.headline %></h1>
<p class="lead mt-4 mb-5">
<%= @hero.fields['sub-headline'] %>
</p>
<p><img class="img-fluid" src="<%= @hero.fields.image %>" alt="Mockup" /></p>
<a href="<%= @hero.fields.button_url %>" class="btn btn-primary btn-lg mt-5 mb-5"><%= @hero.fields.button_label %></a>
</div>
</div>
</div>
</section>
<!--features section-->
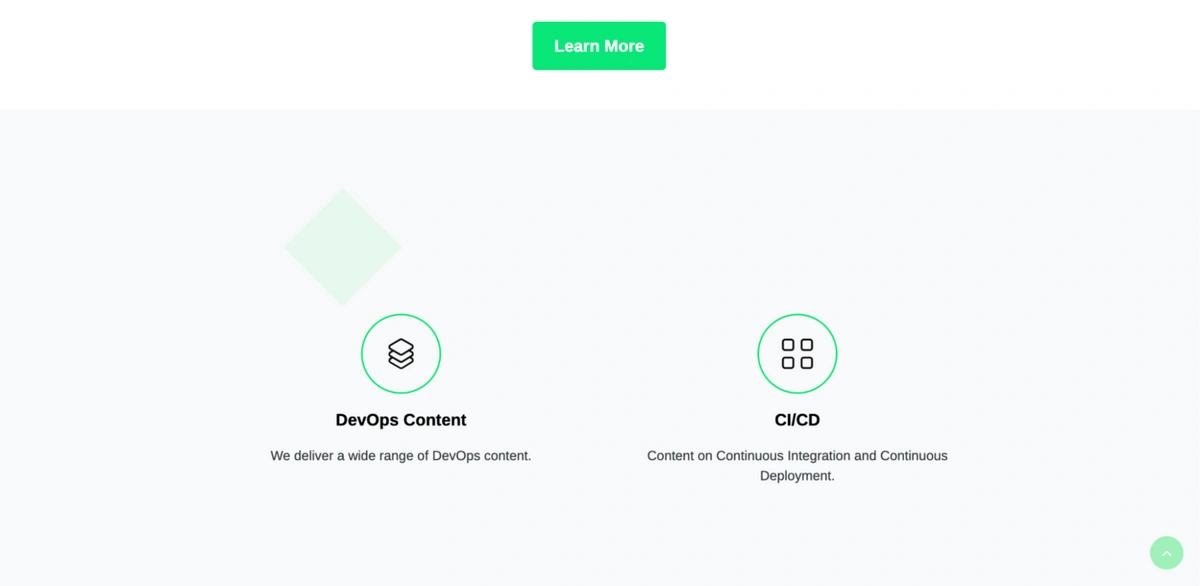
<section class="bg-light py-7" id="services">
<div class="container">
<div class="row">
<div class="col-md-7 mx-auto">
<h2 class="dot-circle"><%= @our_offer.headline %></h2>
<p class="text-muted lead"><%= @our_offer['sub-headline'] %></p>
</div>
</div>
<div class="row mt-5">
<div class="col-md-10 mx-auto">
<div class="row card-services">
<% @our_offer.fields.features.each do |offer| %>
<div class="col-md-6 mb-3">
<div class="card">
<div class="card-body text-center">
<div class="icon-box border-box">
<div class="icon-box-inner small-xs text-primary">
<img width="60" height="60" src="<%= offer.icon %>" />
</div>
</div>
<h5 class="mt-0 mb-3"><%= offer.headline %></h5>
<%= offer.description %>
</div>
</div>
</div>
<% end %>
</div>
</div>
</div>
</div>
</section>
<!--call to action-->
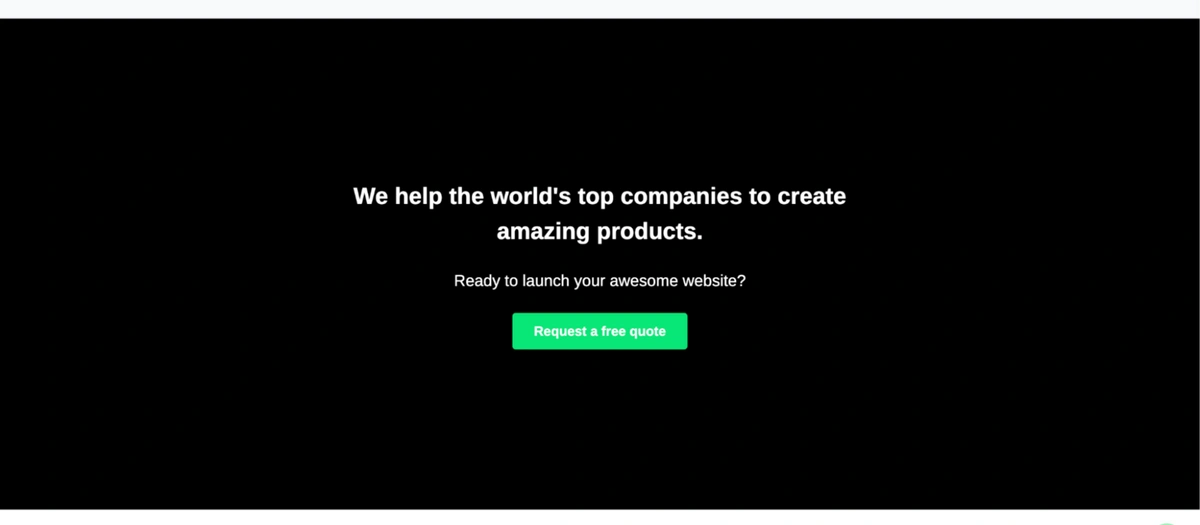
<section class="bg-hero py-8" >
<div class="container">
<div class="row">
<div class="col-md-7 mx-auto text-center">
<h2 class="text-white">We help the world's top companies to create amazing products.</h2>
<p class="lead text-white my-4">Ready to launch your awesome website?</p>
<button class="btn btn-primary">Request a free quote</button>
</div>
</div>
</div>
</section>
<!--contact section-->
<section class="py-7" id="contact">
<div class="container">
<div class="row">
<div class="col-md-6 mx-auto text-center">
<h2>Want to work with us?</h2>
<div class="divider bg-primary mx-auto"></div>
<p class="text-muted lead">
Are you working on something great? We'd love to help make it happen.
</p>
</div>
</div>
<div class="row mt-5">
<div class="col-md-8 mx-auto">
<form>
<div class="row">
<div class="col-md-6">
<div class="form-group">
<input type="text" class="form-control" placeholder="Your name">
</div>
</div>
<div class="col-md-6">
<div class="form-group">
<input type="email" class="form-control" placeholder="Your email address">
</div>
</div>
<div class="col-md-6">
<div class="form-group">
<input type="tel" class="form-control" placeholder="Phone number">
</div>
</div>
<div class="col-md-6">
<div class="form-group">
<input type="url" class="form-control" placeholder="Your website">
</div>
</div>
<div class="col-12">
<div class="form-group">
<textarea rows="5" class="form-control" placeholder="What are you looking for?"></textarea>
</div>
</div>
</div>
<div class="text-center mt-3">
<button class="btn btn-primary">Send your message</button>
</div>
</form>
</div>
</div>
</div>
</section>
<!--footer / contact-->
<footer class="py-6 bg-light">
<div class="container">
<div class="row">
<div class="col-md-6 mx-auto text-center">
<ul class="list-inline">
<li class="list-inline-item"><a href="#">Privacy</a></li>
<li class="list-inline-item"><a href="#">Terms</a></li>
<li class="list-inline-item"><a href="#">Affiliates</a></li>
<li class="list-inline-item"><a href="#">Support</a></li>
<li class="list-inline-item"><a href="#">Blog</a></li>
</ul>
<p class="text-muted small text-uppercase mt-4">
Follow us on social media
</p>
<ul class="list-inline social social-dark social-sm">
<li class="list-inline-item">
<a href=""><i class="fa fa-facebook"></i></a>
</li>
<li class="list-inline-item">
<a href=""><i class="fa fa-twitter"></i></a>
</li>
<li class="list-inline-item">
<a href=""><i class="fa fa-google-plus"></i></a>
</li>
<li class="list-inline-item">
<a href=""><i class="fa fa-dribbble"></i></a>
</li>
</ul>
</div>
</div>
<div class="row mt-5">
<div class="col-12 text-muted text-center small-xl">
© 2019 Union - All Rights Reserved
</div>
</div>
</div>
</footer>
<!--scroll to top-->
<div class="scroll-top">
<i class="fa fa-angle-up" aria-hidden="true"></i>
</div>
Import the JavaScript file into your assets/config/manifest.js file with:
//= link_tree ../images
//= link_directory ../stylesheets .css

//= link_directory ../javascripts .js
Creating a navigation menu with collections
Without a navigation menu, our landing page will be incomplete. We need to create a Main Menu collection to handle page navigation and allow us to create menu collections and navigation items.
To create the Navigation Items collection, go to the Content Types tab in the sidebar and click the "+" icon next to Collections:
Let's create a new collection with the following fields:
-
Short Text field: Label
-
Short Text field: URL
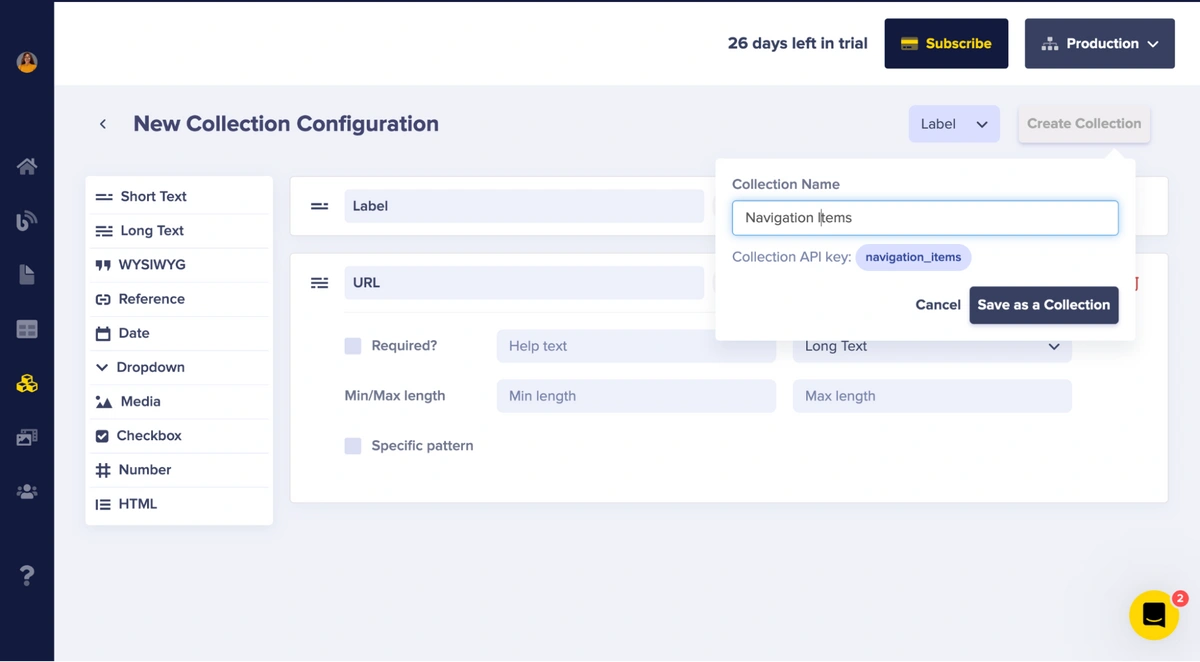
After that, click the Create Collection button, which will prompt you to give the Collection a name. Let's call the collection "Navigation Items". Then, click the Save as a Collection button:
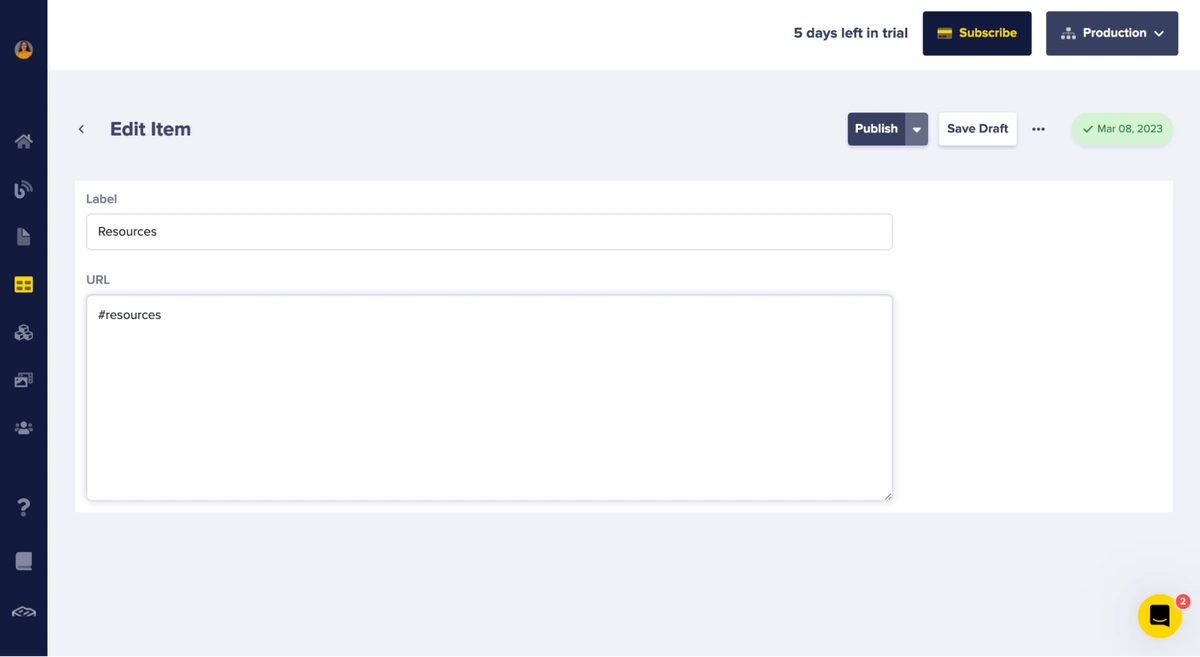
Afterward, you will be directed to a page where you can add menu items to the navigation items. Let's begin by creating a Resources menu item with a label and a URL (#resources). Then, click the Publish button:
Let's add some more menu items to our Navigation Items collection. Navigate to the Collections tab on the sidebar to see a list of options:
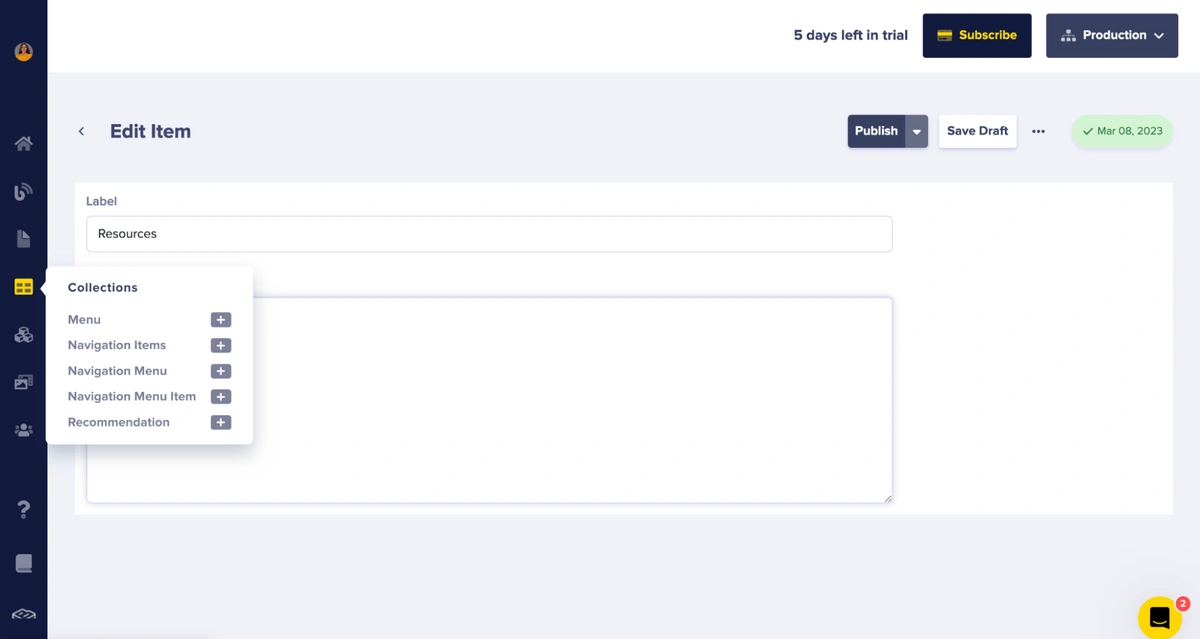
Select the "+" icon next to Navigation Items from the list of options to create the menu items. Enter a label and URL to add the remaining menu items, and click the Publish button before proceeding.
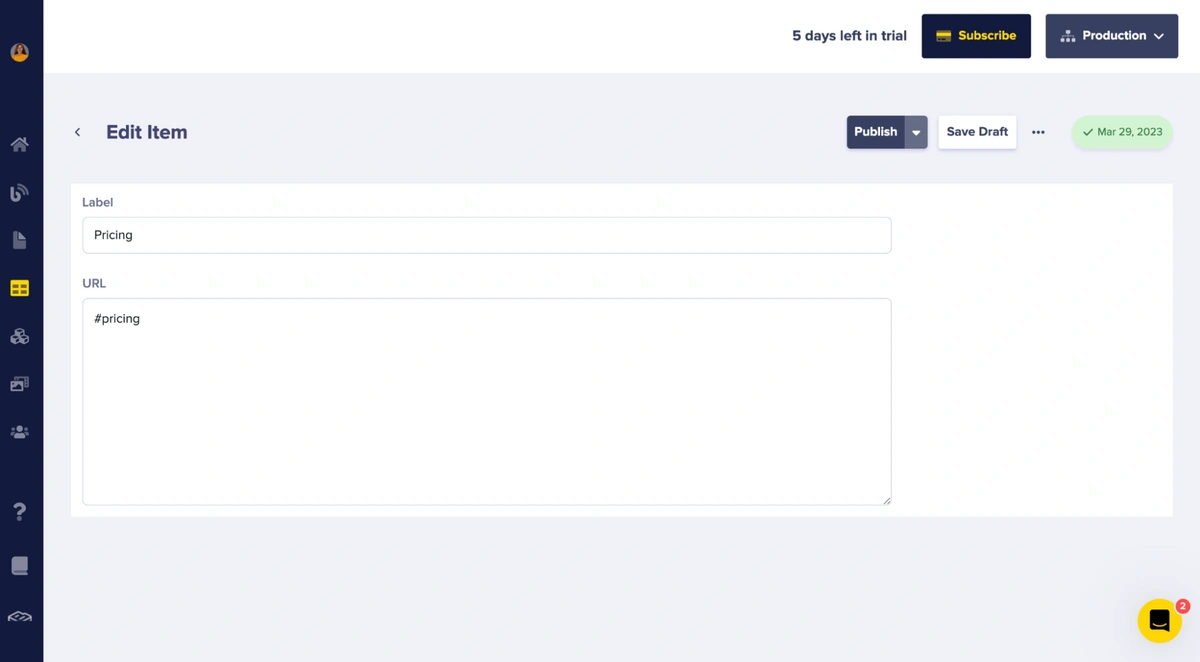
Add a label called “Pricing” and “#pricing” as the URL:
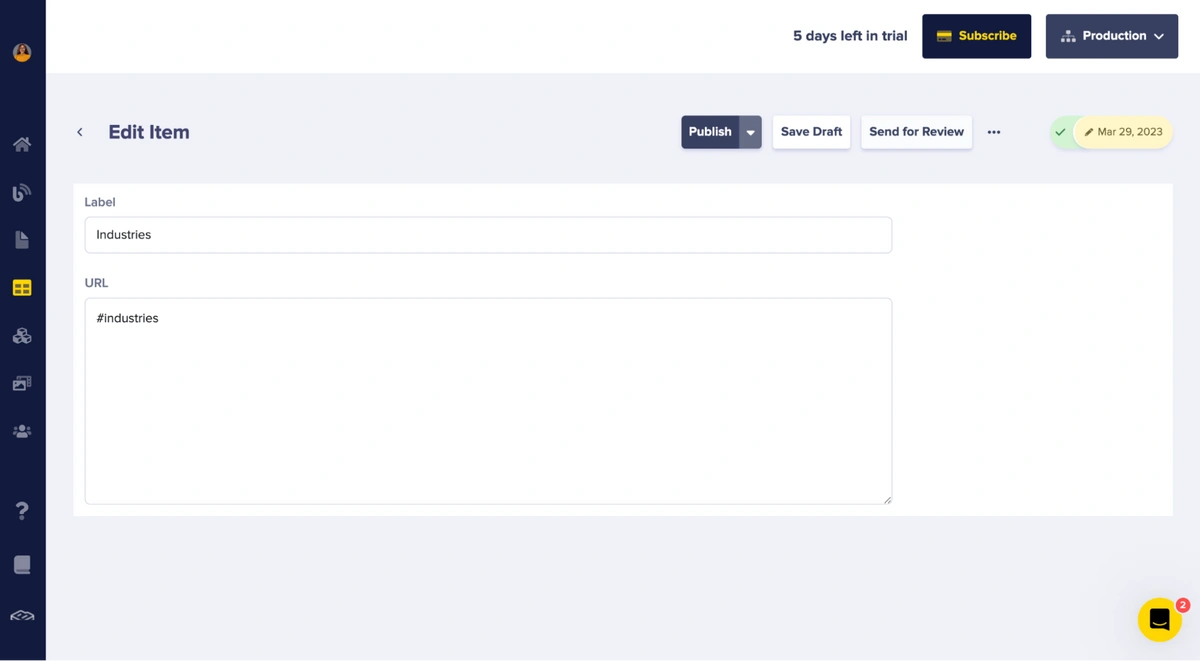
For the second menu item, add a label called “Industries” and “#industries” as the URL:
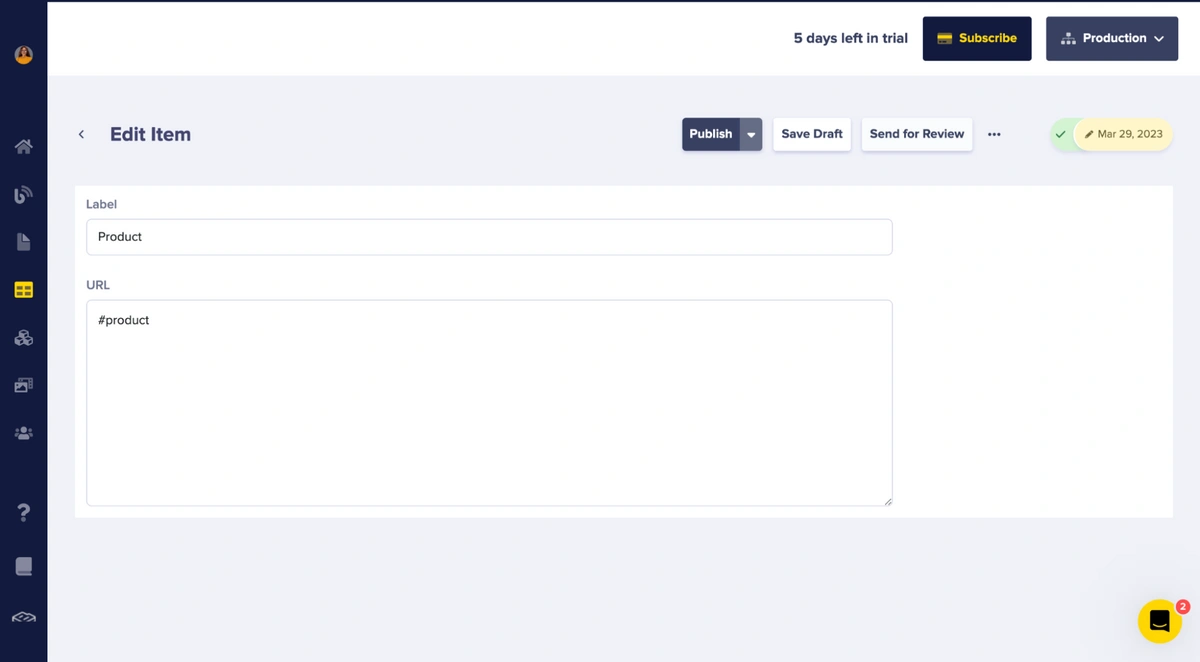
For the third menu item, add a “Product” label and “#product” as the URL:
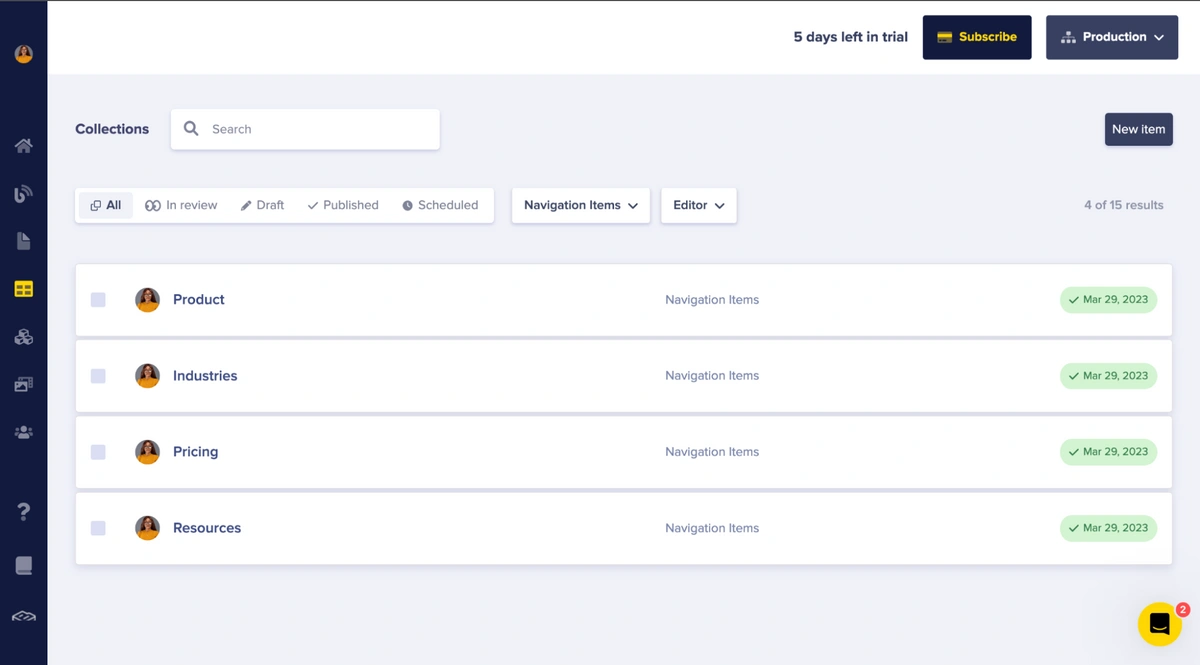
We have now completed the creation of our navigation items. To view the items, select Navigation Items from the list of collection options:
Let's create another collection called "Menu" to group our menu items together. Navigate to the Content Types tab and click the "+" icon next to Collection. Then add the following:
-
A menu label using the Short Text field
-
A menu items reference using the Reference field
-
From the dropdown of “What will this reference?”, select the Navigation Items collection
-
Select the One-to-Many option
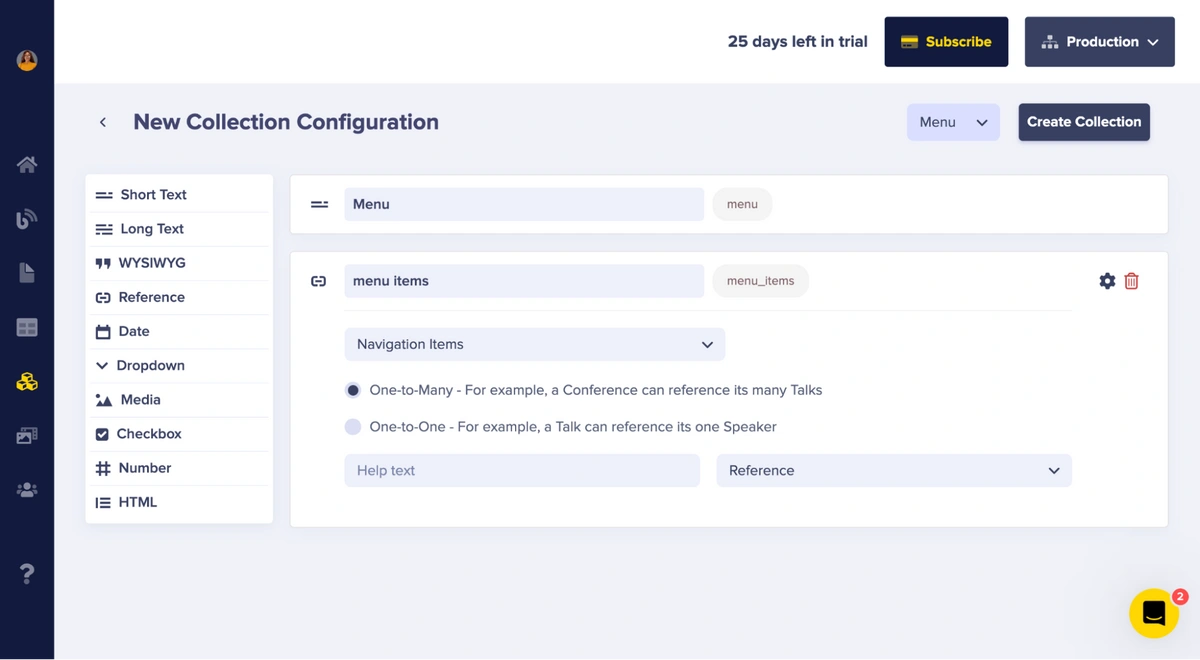
To save the collection, click the Create Collection button and name it "Menu".
After you save the collection, you will be redirected to a page where you can add an item to the created Menu collection. Let's call it "Scoro":
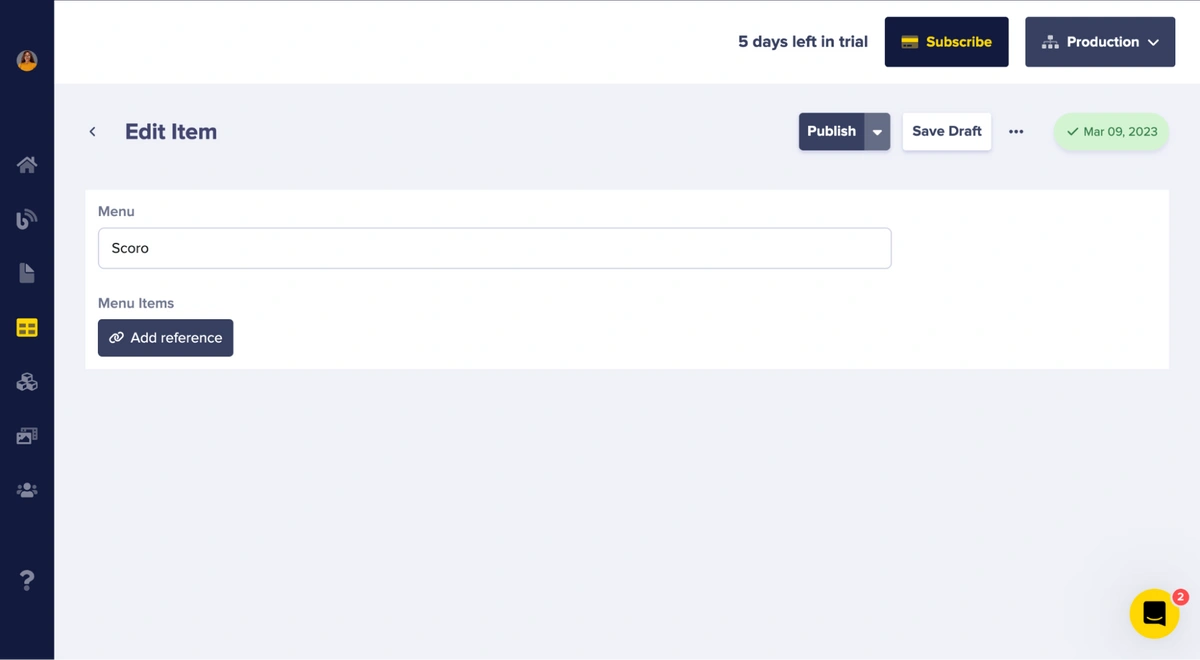
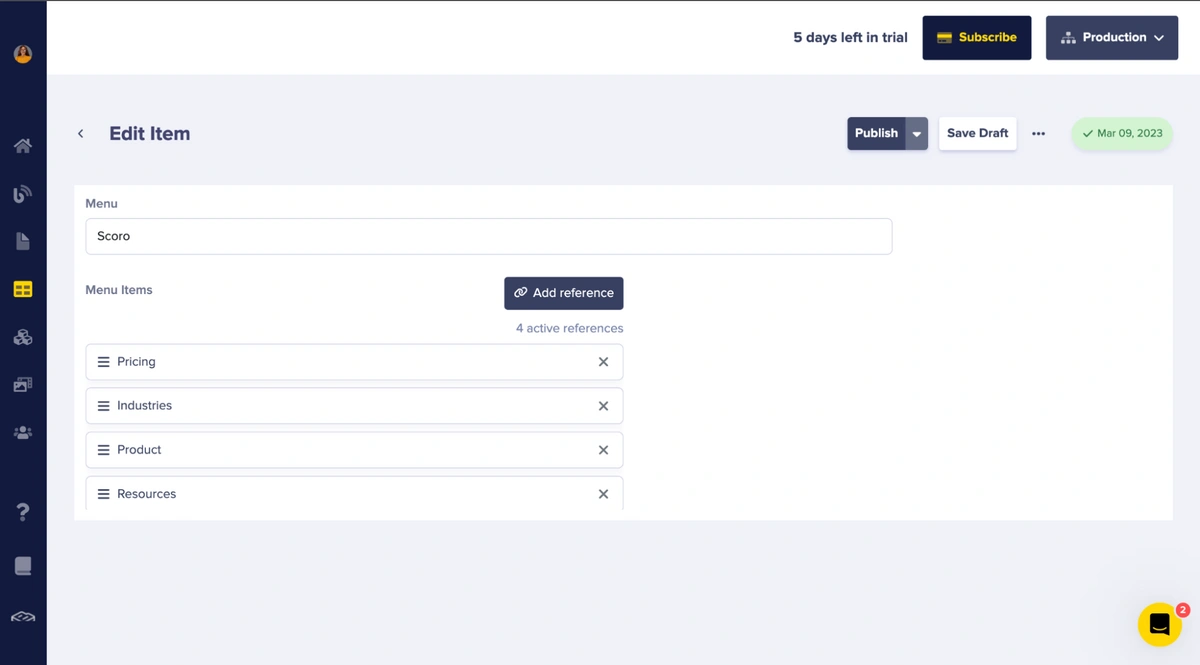
To add the menu items, click the Add Reference button and select all of the navigation items:
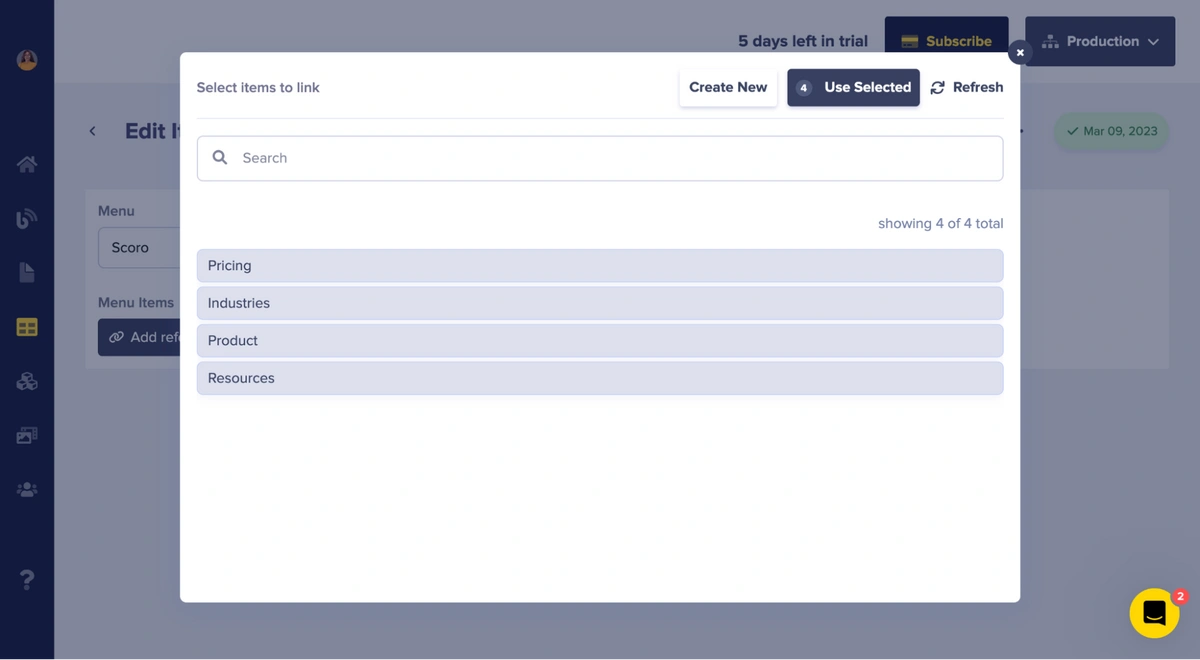
After selecting the items, click the Use Selected button, and the items will be added to the menu. Then, click the Publish button:
Implement the navigation on the landing page in the app > views > page > _nav.html.erb file with the following code:
<!--navigation-->
<nav class="navbar navbar-expand-md navbar-light bg-white fixed-top sticky-navigation">
   <a class="navbar-brand mx-auto" href="index.html">
       Debby
   </a>
   <button class="navbar-toggler navbar-toggler-right border-0" type="button" data-toggle="collapse"
           data-target="#navbarCollapse" aria-controls="navbarCollapse" aria-expanded="false" aria-label="Toggle navigation">
       <span data-feather="grid"></span>
   </button>
   <div class="collapse navbar-collapse" id="navbarCollapse">
       <ul class="navbar-nav ml-auto">
           <% @menu.each do |menu_item| %>
               <li class="nav-item">
                   <a class="nav-link page-scroll" href="<%= menu_item.url %>" ><%= menu_item.label %></a>
               </li>
           <% end %>
       </ul>
       <form class="form-inline">
           <p class="mb-0 mx-3"><a class="page-scroll font-weight-bold" href="#contact">Work with us</a></p>
       </form>
   </div>
</nav>
To render the navigation in the landing page, add the following to the top of the app > views > page > index.html.erb file:
<%= render 'nav' %>
Creating the testimonial section
A testimonial section is common on landing pages, so let's include one on ours. This will require the creation of a new collection. Return to the Content Types tab and click the "+" icon next to Collections:
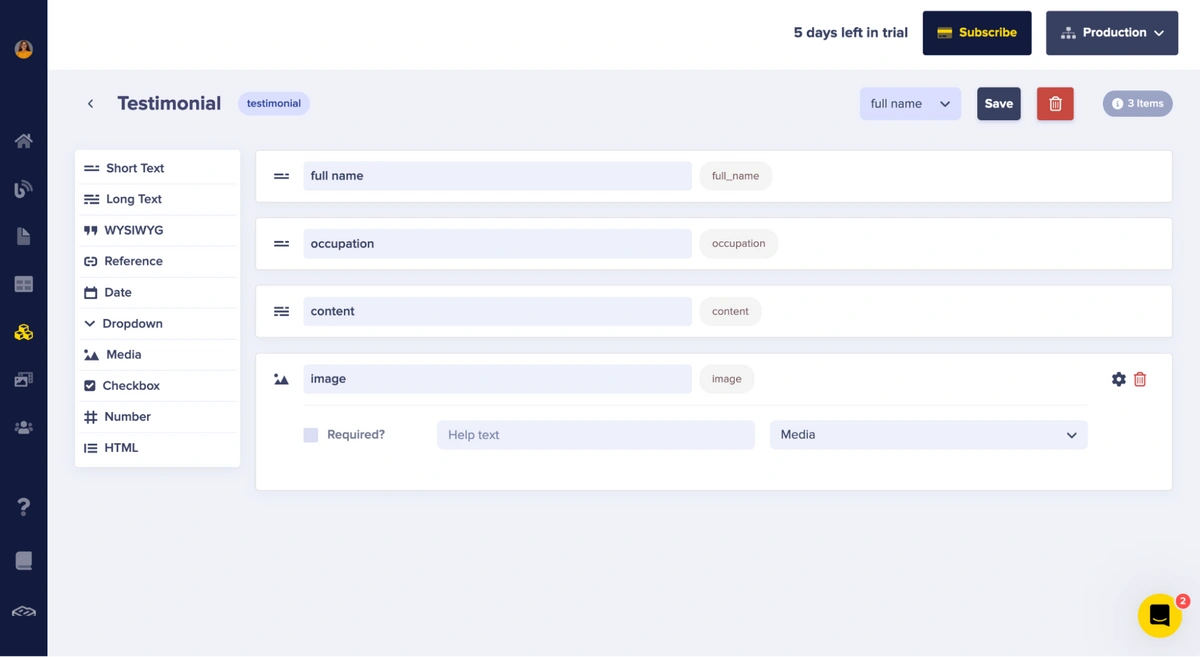
Let’s add the following fields to this collection:
-
Short Text field: full name
-
Short Text field: occupation
-
Long Text field: content
-
Media: image
Save the collection by clicking Create Collection and entering the name “Testimonial” and clicking Save as a Collection:
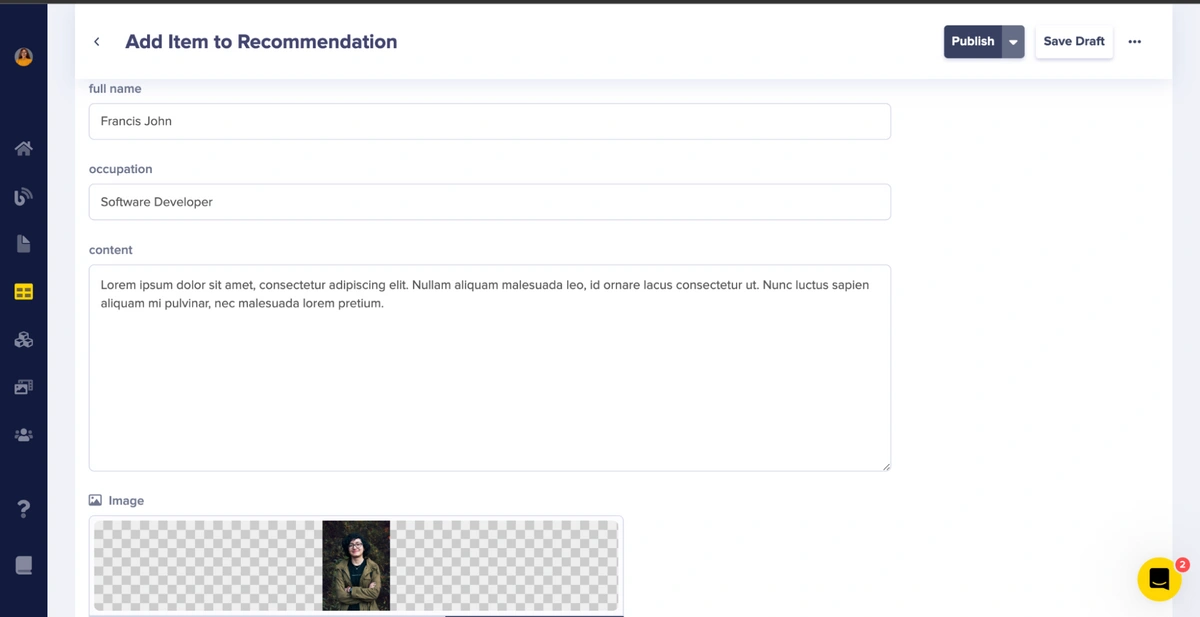
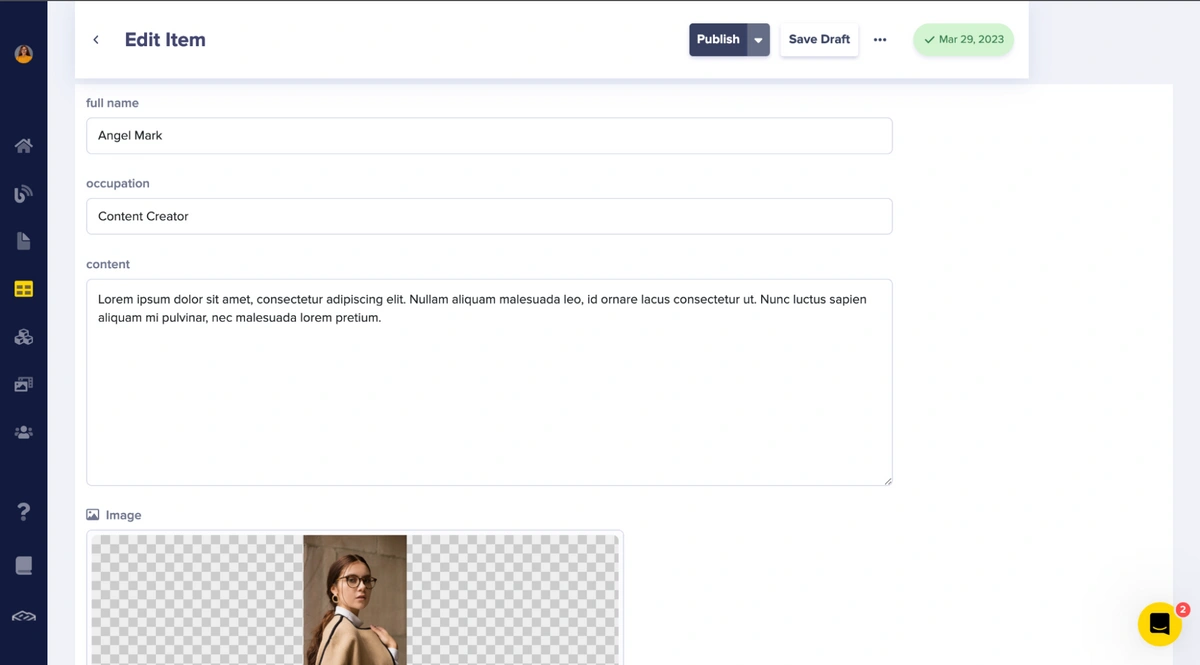
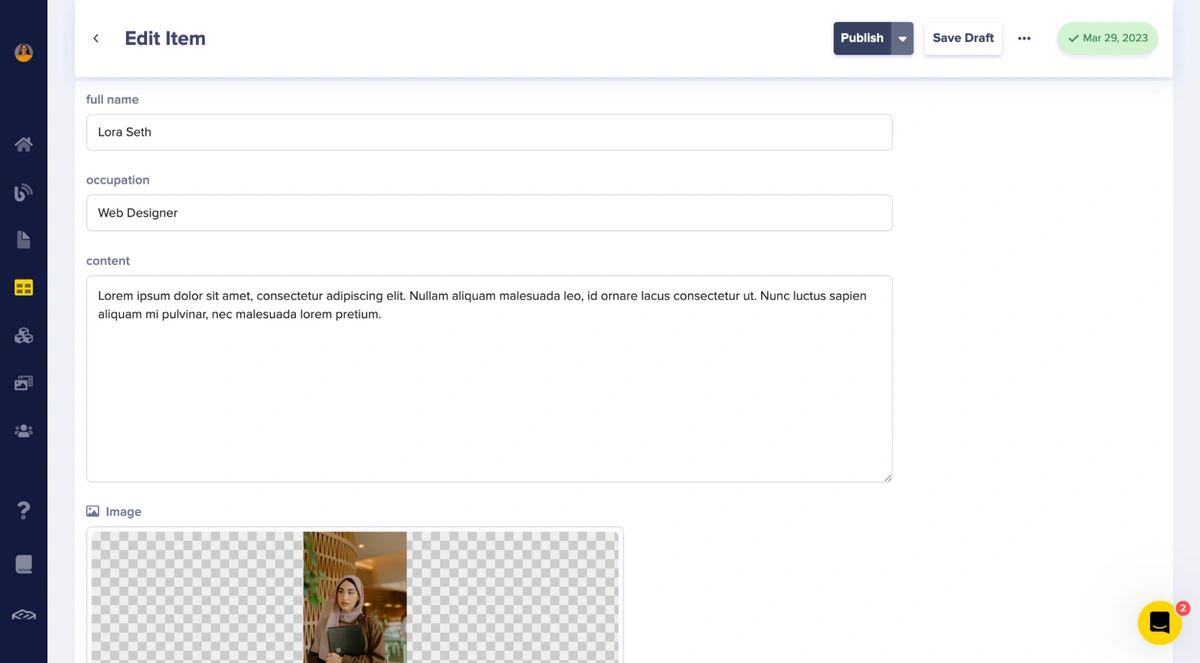
Next, add details to the fields you just created for the Testimonial collection before clicking the Publish button:
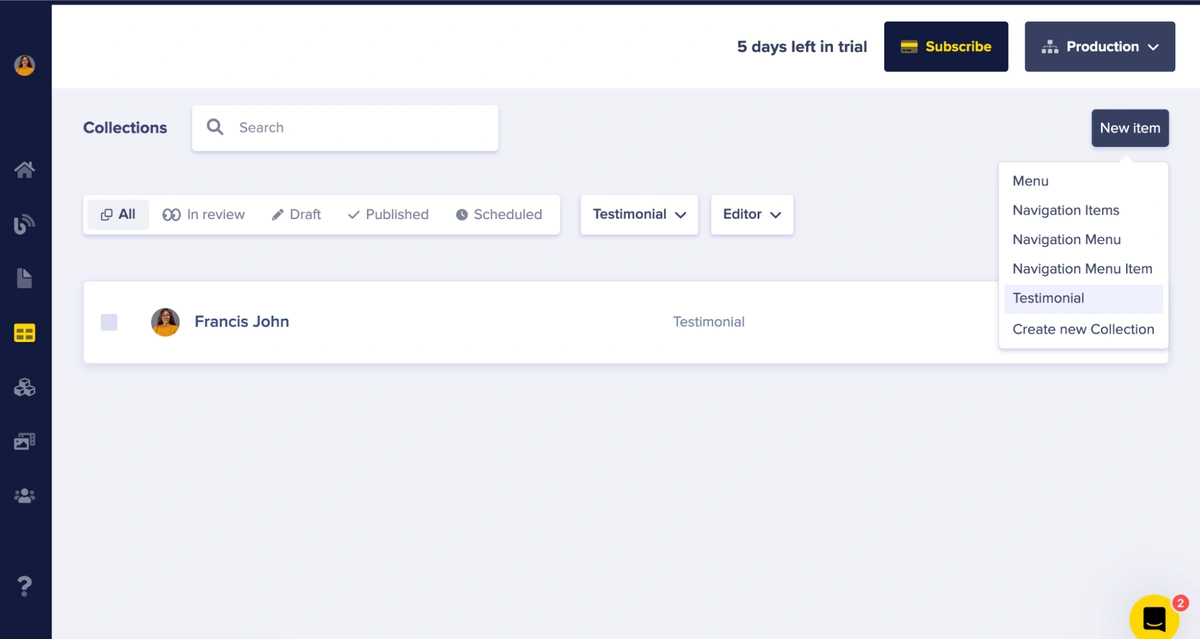
To add more items, navigate to the Collections tab and choose Testimonial from the drop-down menu:
Then, click the New Item button and select “Testimonial” to add another item:
Add the details to the item and click Publish:
Add another item to the Testimonial collection by navigating to the Collections tab and clicking the “+” icon next to the Testimonial option:
To implement the Recommendation (Testimonial) section, add the following code in your index.html.erb file:
<!--- @recommendation --->
<section class="py-7">
<div class="container">
<h1> Recommendation </h1>
<div class="row">
<% @recommendation.each do |client| %>
<div class="col-md-4 mb-3">
<div class="card">
<div class="mb-3">
<h3><%= client.full_name %></h3>
<p><%= client.occupation %></p>
</div>
<div class="image-holder mb-3">
<img src="<%= client.image %>" />
</div>
<div><%= client.content %></div>
</div>
</div>
<% end %>
</div>
</div>
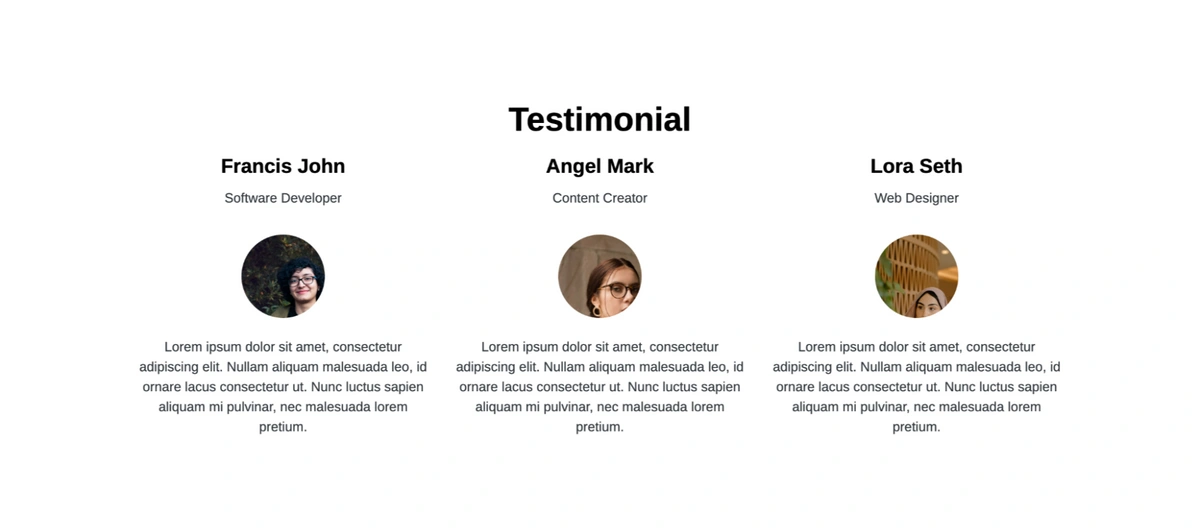
</section>Run the application with this command:
./bin/rails server
Then, go to the URL http://localhost:3000/ to view your running application:
Closing thoughts
Combining Rails with ButterCMS simplifies managing landing page content, providing essential resources for efficient and consistent development. ButterCMS's features like collections, components, page types, and customizable content modeling enable easy landing page building. Utilizing Rails and ButterCMS optimizes efforts for developers and non-technical users while preserving consistency. Check out the official documentation to learn more about Rails and ButterCMS.
To learn more on how you can you can use Rails (and Ruby) with ButterCMS, check out the tutorials below:
- Launching Your Own Ruby Gem - Part 1: Build It
- Launching Your Own Ruby Gem (Part 2): Popularizing it Within the Ruby Community
- JSON Serialization in Rails: A Complete Guide
Make sure you receive the freshest Rails tutorials and Butter product updates.
ButterCMS is the #1 rated Headless CMS


Related articles
Don’t miss a single post
Get our latest articles, stay updated!
Deborah Emeni is a software developer and professional technical writer with more than three years of experience in web development.